.gif)
MTH DCS / Protosound 2&3
Information & Video Overview
Updated 8/25/2022
![]()

____________________________________________________________________________________________________________________
Click on the below link for:
What is MTH DCS and Protosound 2 or 3?
See the Quick Checklist of things to check before you get started
See the DCS Tips and Operating help page for help and troubleshooting
See the DCS Users Manual: MTH DCS Users Manual (Fifth Edition)
System Components (Protosound boards: PS1/PS2/PS3 - TIU - Wireless Remote - AIU - WIU (Wi-Fi Interface Unit) - Plus: DCS Commander System/Controller - DCS Remote Commander)
Video Overview:
Using DCS System and operating Protosound 2 or 3 equipped engines:
Protocast feature (Allows you to connect a CD or MP3 player into the TIU and play music through your engine's speaker)
Proto-Dispatch feature (Allows you to connect a separate microphone and talk through your train's speaker with your own voice)
DCS Remote - Complete photo overview of Remote and Menu options
AC Analog Operation of PS2/PS3 Engines (Using AC Throttle power supply with Whistle & Bell Buttons)
__________________________________________________________________________________
What exactly is MTH DCS and Protosound 2 or 3?
DCS is the advanced digital control system created by train manufacturer MTH (Mike's Train House) that is used to control engines with a Protosound 2 or 3 sound & control board installed. (All engines made by MTH come with Protosound 2 or 3 pre-installed.) Not to be confused with DCC, DCS stands for Digital Command System and is not related to DCC although it has a similar high level function... it allows the user to set and keep a constant voltage (18-24v) to the track and fully control the trains via a wireless remote control. DCS can operate on standard DC or AC power supplies. (Note: HO scale engines are DC only except for those with Protosound 3E+)
To get started running your Protosound equipped trains you can run them with either:
O, S, G/One Gauge: (0-24v DC or AC) (These PS3 engines can operate on DCC if equipped with DCS/DCC selector switch)
1) Just an AC or DC power supply and control them with just the throttle via variable track power
(Note: Some AC power supplies have buttons to trigger the bell and whistle. Cannot trigger bell/whistle with just DC analog power supply)
OR
2) Use an AC or DC power supply along with the DCS remote and TIU (Track Interface Unit) set. (Running with Remote and TIU allows to access/trigger all features and sounds.)
HO scale: (Applies to all MTH HO PS3 engines with "8x-xxxx-1" as the product number) (0-18v DC or DCC)
1) Analog DC
2) DCC (Digital Command Control)
- Safe to use with all DCC Stations as they output NMRA-spec power regardless of the input power type.
- Yes, DCC is understood to be a modified AC sine-wave output to the track for all DCC systems regardless of the input power type used (either AC or DC)
3) DCS Control (w/DC power supply only)
4) DO NOT USE Analog AC power!
(However, engines with Protosound 3E+ can also run on AC (engines with product number that end in "-5" 8x-xxxx-5) (DC or AC power 0-18v) *CHECK YOUR OWNERS MANUAL TO BE SURE*
HO scale Product numbers:
- 8x-xxxx-1 = PS3 equipped
- 8x-xxxx-5 = PS3E+ equipped (means can also run on AC power)
- 8x-xxxx-0 = DCC Ready (Runs on Analog DC only until customer installs their desired DCC electronics board)
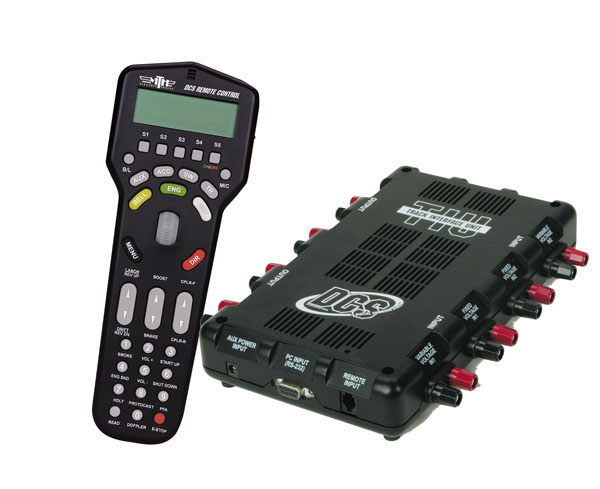
The DCS remote is a wireless handheld remote that you use to control your trains. The TIU is the main electronics box that goes between the power supply and track that takes commands from the Remote and converts them to a digital signal that is added to the power going to the track. (Remote and TIU cost ~$309.00) A Wi-Fi interface unit (WIU) is now available that can replace (or be used together with) your MTH DCS remote and allows you to run your trains with any Android or iOS device.
(Note: The old original Protosound 1 equipped engines cannot be controlled with the Remote and TIU).
See the DCS Users Manual: MTH DCS Users Manual (Fifth Edition)
Versions of Protosound: (Version of the electronics control board in the engine)
Locosound: (O gauge only) These engines cannot be 'added' to the DCS remote (w/TIU) for control digitally. Engines equipped with this version of electronics can only be controlled by variable track power. You will only find this in older MTH O gauge engines. (Provides synchronized sounds w/speed control, horn, whistle, bell and directional lighting)
Protosound 1: (O gauge only) Original version of Protosound. These engines cannot be 'added' to the DCS remote (w/TIU) for control digitally. This version of Protosound can only be controlled by variable track power. You will only find this in old MTH O gauge engines. (1999 and older)
Protosound 2: (O gauge, One Gauge/G scale, Upgrade kit boards) Modern digital sound and control that can be controlled with the DCS remote & TIU. All MTH One Gauge production (prior to 2013 catalog) was PS2.0. (PS2.0 cannot be controlled or run on a DCC layout.) (2000-2003: 5v boards, 2004-end: 3v boards)
Protosound 3: (O gauge, S, One Gauge/G scale, HO, Upgrade kit boards) Newest version of Protosound available and is controllable with all versions of the DCS remote & TIU.
All new production MTH engines (in all scales) come equipped with PS3.0. (Also see: What's new with Protosound 3 vs 2)
(PS3.0 can be controlled and run on a DCC layout.)
(Note: HO scale PS3 engines run under DC power only. HO scale engines with Protosound 3E+ can run on DC or AC.) *CHECK YOUR OWNERS MANUAL TO BE SURE*
Protosound 3E+ engines are for 3 rail HO track only and will not operate on 2 rail track.
Protosound board: (Installed in engine. As noted above can be either Protosound 1, 2 or 3)
The Protosound board in the engine controls all: Lights, Sounds, Speed and Smoke on the engine
To buy Upgrade kit to install in your engine or request upgrade service visit my Sales and Pricing page or email me at:
Protosound 2 and 3 boards can run under both AC or DC power and under either variable track voltage (for analog control without remote&TIU) or under constant track voltage with Remote and TIU.
Note: HO scale PS3 engines run under DC power only. HO scale engines with Protosound 3E+ can run on DC or AC
TIU: (Track Interface Unit - 50-1003) (Note: DCS Wireless Remote (50-1002) OR Wi-Fi Interface Unit (50-1034) - *Also Required*) (TIU & Remote set: 50-1001 )
This is the device that you connect to the track/layout and use a power supply of your choice to provide track power to your trains. The wireless handheld remote communicates user commands wirelessly to&from the TIU and the TIU communicates with engines on the layout via signals sent through the track rails.
If using a DC power supply on your layout, you can only use and send digital control commands to the track with the Fixed 1 and Fixed 2 Ports
If using an AC power supply on your layout, you can use and send digital control commands to the track with the four ports: Variable 1, Variable 2, Fixed 1 and Fixed 2
Each Port is limited to 12amps/190watts (in Normal mode)
Connect TIU in Passive mode for unlimited amperage (No 12amp limit)
Firmware (DCS firmware versions) is available free of charge from MTH and should match the version in the wireless remote. (*Click here for info on upgrades and current versions*)
The same TIU, Wireless Remote, AIU, WIU(Wi-fi Interface Unit), etc is used for any Protosound 2 or 3 equipped engine in all scales (HO, O, G, etc)
See the DCS Users Manual: MTH DCS Users Manual (Fifth Edition)
Auxiliary Power Supply for TIU requires: 12-22VAC, 1.5amp
To buy a TIU *click here*
Wireless Remote: (DCS Wireless Remote) (Note: TIU (Track Interface Unit) - *Also Required*) (MTH #50-1002 Wireless Remote only or #50-1001 TIU & Remote set)
This is the wireless handheld remote that you use to control your Protosound 2 or 3 equipped engines. The DCS remote communicates user commands wirelessly with the TIU and the TIU communicates with engines on the layout via signals sent through the track rails.
Firmware (DCS firmware versions) is available free of charge from MTH and should match the version in the TIU. (*Click here for info on upgrades and current versions*)
The same Wireless Remote, TIU, AIU, WIU (Wi-Fi Interface Unit), etc is used for any Protosound 2 or 3 equipped engine in all scales (HO, O, G, etc)
See the DCS Users Manual: MTH DCS Users Manual (Fifth Edition)
To buy a Wireless Remote *click here*
AIU: (Accessory Interface Unit) (Note: TIU (Track Interface Unit) & either DCS Wireless Remote or Wi-Fi Interface Unit *Also Required*) (MTH #50-1004 AIU)
AIU is an optional device used to control track accessories, switches/turn-outs, lights, etc with the DCS Wireless Remote.
To buy an AIU *click here*
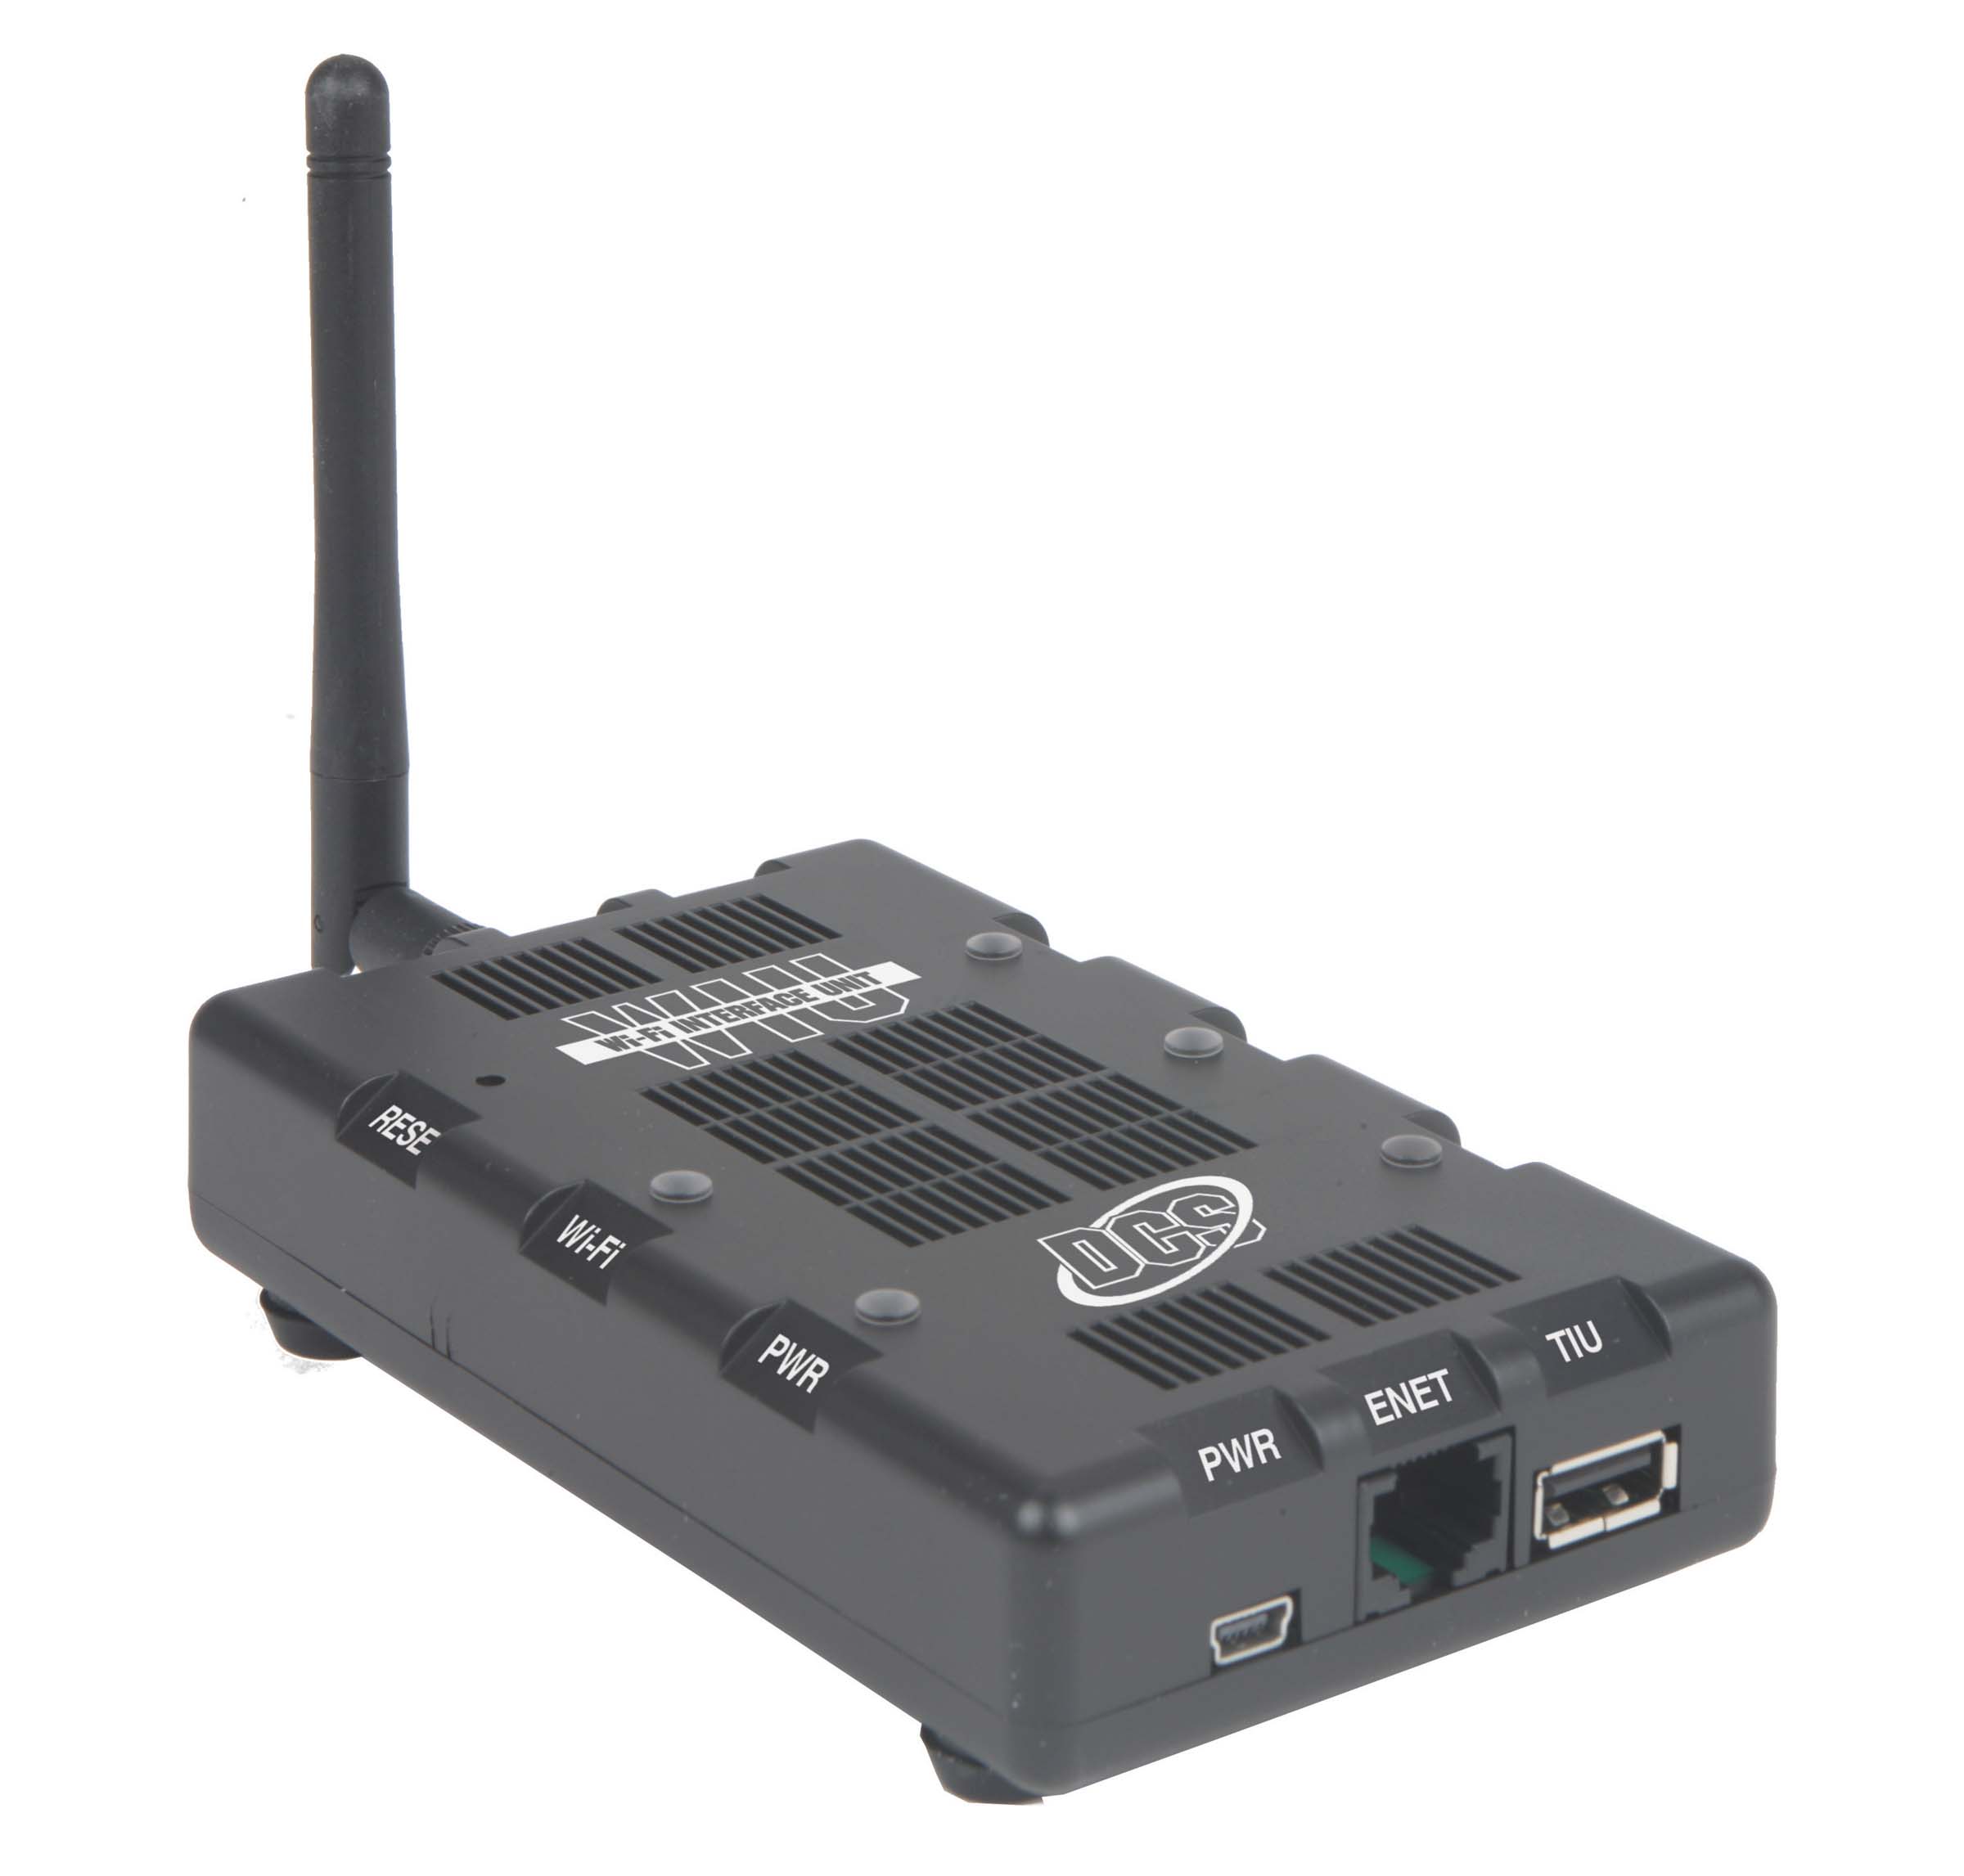
WIU: (Wi-Fi Interface Unit) (Note: TIU (Track Interface Unit) *also required*) (MTH #50-1034 WIU Wi-Fi Interface Unit)
For more information/help: *WIU Detail Information on Rayman4449.com*
Discuss on forums: *Click Here*
This is an optional device that allows you to control your Protosound 2 or 3 equipped engines with an Android or iOS(Apple) phone or tablet.
Can use this Wi-Fi device instead of the DCS Wireless Remote. Both can be used at the same time.
Wi-Fi Interface Unit (WIU) connects to TIU via USB cable to either the USB port (on Rev L or newer TIU) or the RS-232 Serial port (on older TIUs that don't have USB port)
For connection to RS-232 port, USB to Serial cable will be required (*Buy USB to Serial here*)
Each TIU requires its own Wi-Fi Interface Unit
Wi-Fi Interface Unit can:
Create its own Wi-Fi network that phones and devices connect to directly OR
Connect to your existing home Wi-Fi router wirelessly (and have phones access/connect to WIU via your home router/network) OR
Connect to your existing home Wi-Fi router via standard hardwired RJ45 Ethernet connection (and have Android/Apple iOS devices connect to WIU via your home router/network)
Videos:
The same Wi-Fi Interface Unit, TIU, Wireless Remote, AIU, etc is used for any Protosound 2 or 3 equipped engine in all scales (HO, O, G, etc)
To buy a Wi-Fi Interface Unit *click here*
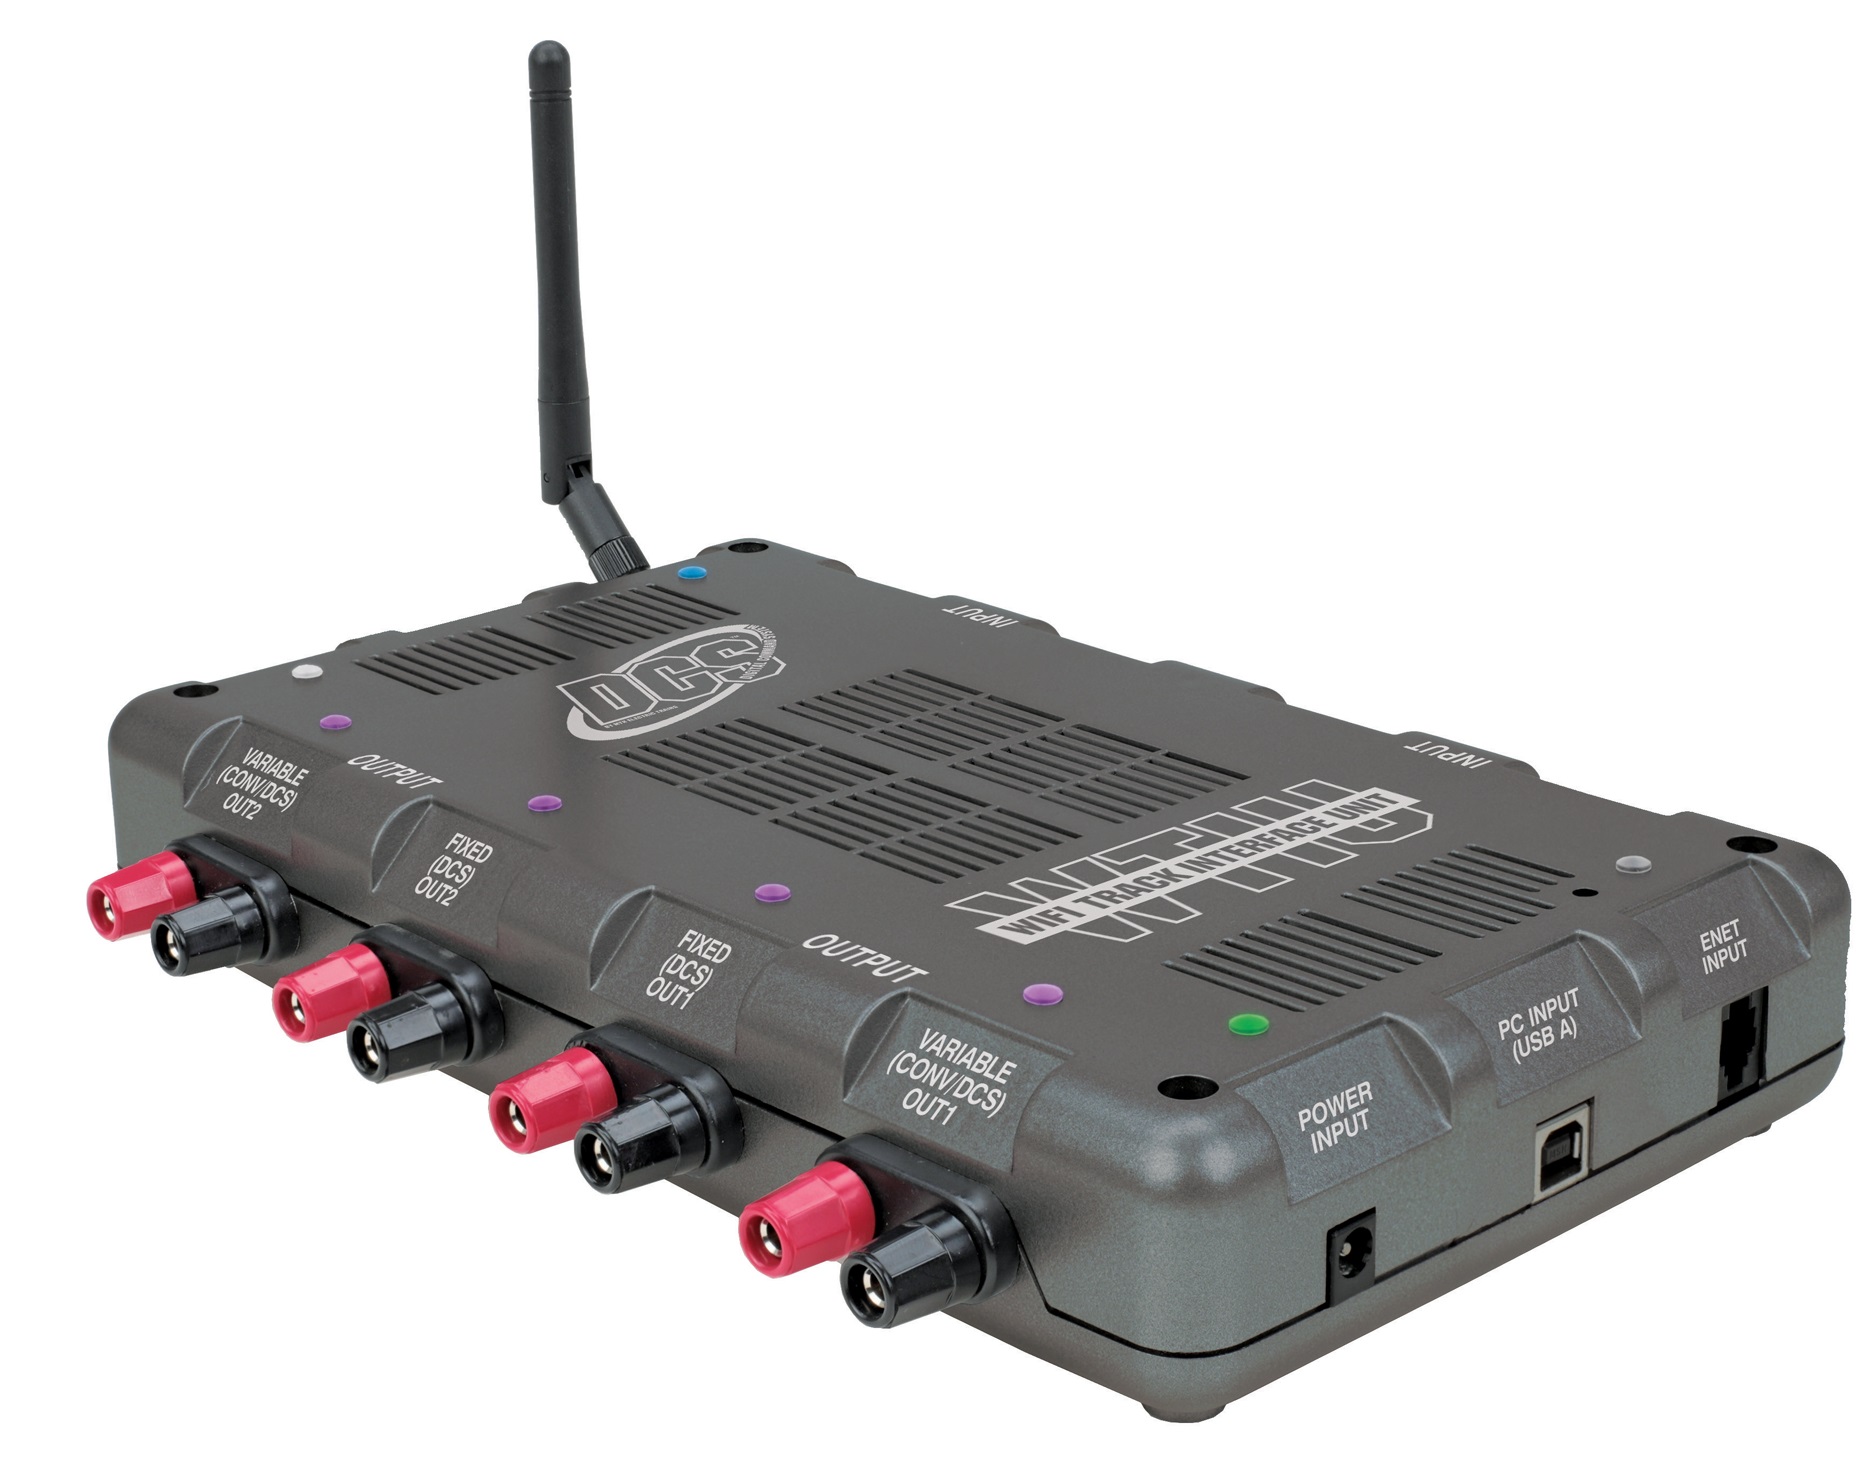
WTIU: (Wi-Fi Track Interface Unit) (MTH #50-1039 WIU Wi-Fi Interface Unit)
For more information/help: *Coming soon*
Discuss on forums: *Coming soon*
This is a WIU and TIU built into one and allows you to control your Protosound 2 or 3 equipped engines with an Android or iOS(Apple) phone or tablet.
You can still use the DCS Wireless Remote but it must be connected via tether cable. The DCS Remote will not work with the WTIU wirelessly. Both can be used at the same time.
Wi-Fi Track Interface Unit can:
Create its own Wi-Fi network that phones and devices connect to directly OR
Connect to your existing home Wi-Fi router wirelessly (and have phones access/connect to WIU via your home router/network) OR
Connect to your existing home Wi-Fi router via standard hardwired RJ45 Ethernet connection (and have Android/Apple iOS devices connect to WIU via your home router/network)
Videos:
The same Wi-Fi Track Interface Unit, WIU, TIU, Wireless Remote, AIU, etc is used for any Protosound 2 or 3 equipped engine in all scales (HO, O, G, etc)
To buy a Wi-Fi Interface Unit *click here*
DCS Explorer Track Interface Unit: (Wi-Fi Interface Unit) (User Manual) (Note: Power Supply *also required*) (MTH #50-1035 DCS Explorer Track Interface Unit)
For more information/help: *DCS Explorer Detail Information on Gscaletrainforum.com*
Discuss on forums: *Click Here*
This is a stand-alone device that a mini-TIU and WIU built into one that let's you control your Protosound 2 or 3 equipped engines with an Android or iOS(Apple) phone or tablet.
Has limited functionality (vs WIU+TIU) and limited to 3 engines stored in app at any one time and is intended to be for starter users and small simple layouts.
Locomotive Control features available:
Speed control, Horn/Whistle, Bell, Front & Rear Coupler activation, Smoke on/off (using smoke control on engine), Headlight on/off, Locomotive Sound volume, Sound mute, Passenger/Freight sounds, Doppler effect, Locomotive Factory Reset
Some Locomotive features Not available with DCS Explorer: No Playable/Quillable Whistle, No Smoking Whistle
Creates its own WiFi network that you connect your smart-phone/tablet to. (You cannot use the MTH DCS Remote Control)
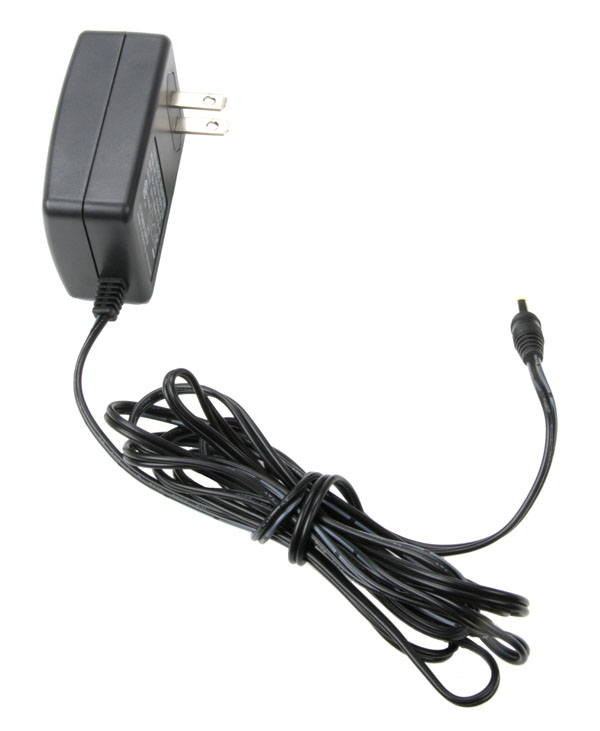
Need to have AC or DC power supply (0-22VAC or 0-24VDC) with the pictured round power plug.
Uses the same DCS WiFi App but has to have app set to 'DCS Explorer' in Settings menu
Limited to 5amps
Videos:
Wifi App Demo (Standard Version) (Video using the full WIU device)
Can be used to control any Protosound 2 or 3 equipped engine in all scales (HO, O, G, etc)
To buy a DCS Explorer *click here*
Other System Components: (These are options other than going with the main system components above)
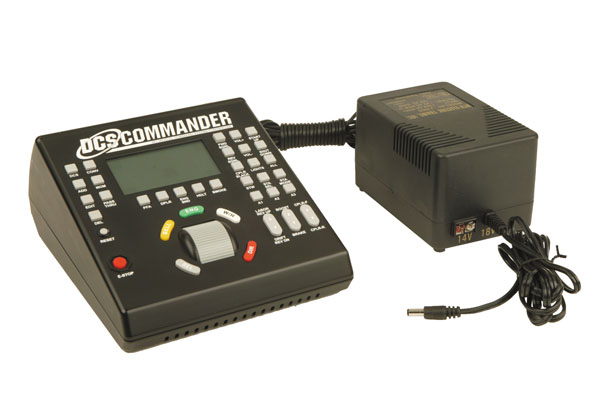
DCS Commander System/Controller: (Owners Manual) (*Discontinued*) (MTH #50-1029 w/100watt power supply, #50-1028 w/o #40-1000a power supply,)
This is a lower cost option (intended for HO scale) vs buying the full TIU, Remote and Power supply setup with most of the same operating/control features as TIU and Remote. It is available with or without power supply.
Input power: 0-24v DC / 0-22v AC up to 6amps
If you plan to run a small limited setup this is a good cost effective option. Generally I recommend purchasing the full DCS set with TIU and Remote for full future scalability.
Stores up to 10 different DCS engines at a time (full DCS Remote/App stores 99)
Can vary track voltage to the track in output DC power (TIU can only vary track power in output AC)
Cannot change Sound sets on engines
To review features available, see the Owners Manual.
This product has been discontinued and will not be produced again.
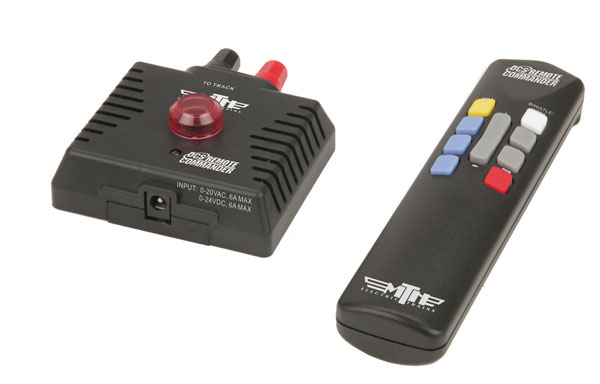
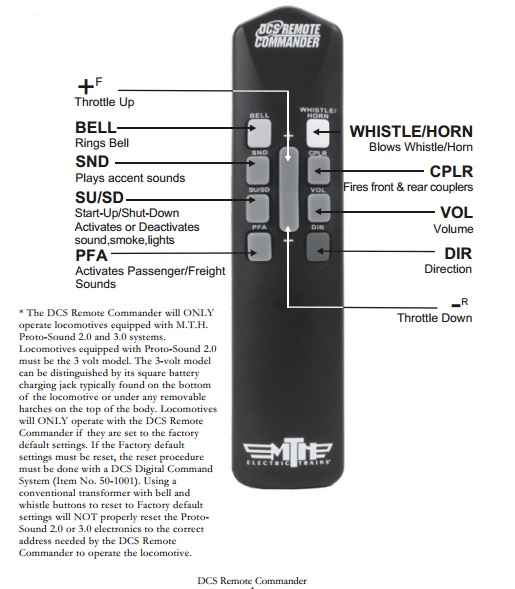
DCS Remote Commander: (Owners Manual) (MTH #50-1033 - Requires Power Supply like #40-1000a)
Provides only the most basic key controls & functions for control of one PS2 (3volt) or PS3 engine (or multiple engines all at once that all follow same command)
Start-up/Shutdown - Direction - Speed - Whistle - Bell - PFA - Coupler firing - Optional sounds - Sound volume
Smoke control: In order to turn the smoke unit off/on you must first disconnect power from the track, manually turn the smoke unit control to the “OFF” or “ON” position, full counter-clockwise or some degree of clockwise position, and reapply power.
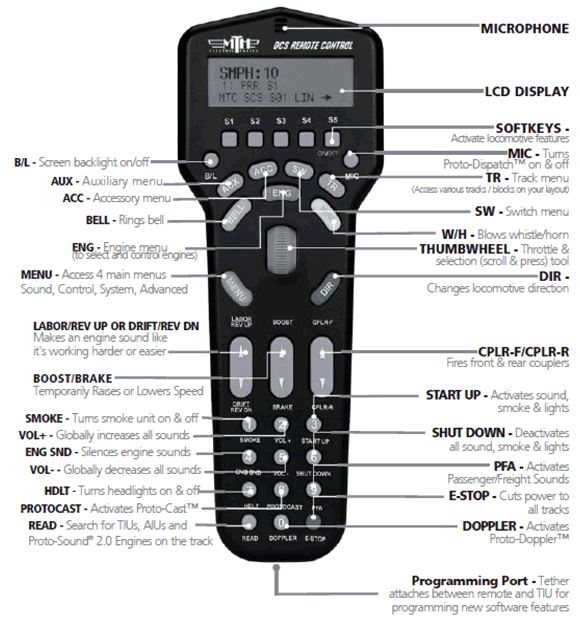
Close-up photo of remote and buttons/functions - Remote
Remote is wireless via Infrared (so this will not be useable outside)
Input power: 0-24v DC / 0-22v AC up to 6amps
This is intended to run a single engine on small indoor displays.
NOTE: This set will control any engine new from the factory. Once you 'add' an engine to a DCS TIU&Remote, TIU&WIU+DCS App, DCS Commander or DCS Explorer, the engine will need to have a 'Factory Reset' performed on it in order to reset the engine to a factory default state.
This reset can be performed with full DCS Remote Control set (TIU/Remote) or TIU&WIU+DCS App(wifi) or DCS Commander or DCS Explorer.
If the engine is PS3 (and is 2014 or newer) it can be reset with the DCS Remote Commander itself by pressing the sound button [SND] (then release), followed by the direction button [DIR] (then release), and lastly [ - ] on the center rocker. (See instructions on Page 7 in Owners Manual link below)
NOTE: A 'Factory Reset' performed with AC power supply using (Horn press x 1 and Bell pressed x 5) will NOT reset the engine ID back to factory setting. So AC power supply factory resets will not restore engine function with a DCS Remote Commander.
Can be connected to track passively like TIU for signal/control (if layout already has power ) (see TIU Passive mode)
To review features available, see the Owners Manual.
To buy a DCS Commander System/Controller *click here*
AC Power Supplies: (O, G/One Gauge, S)
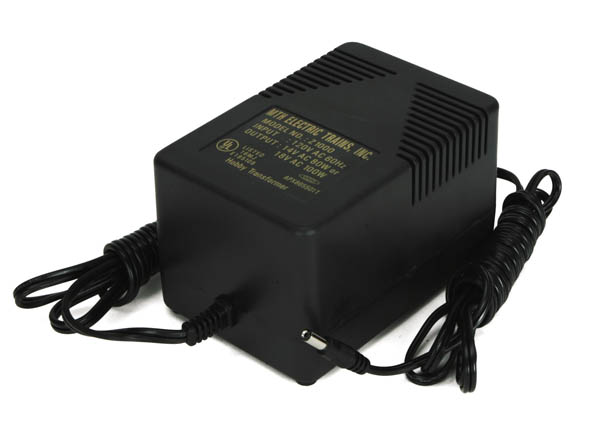
100 watt AC Power Supply: (MTH #40-1000A - For use with other components as MTH #50-1028, or 50-1033)
Provides 18v AC power @ 100watts for trains / 14v AC power @80watts for accessories.
To buy a 100 watt AC Power Supply *click here*
Other AC power supplies work. (Recommend DC power for G scale)
DC Power Supplies: (O, G/One Gauge, S, HO)
Provides fixed 20v DC power @ 3.25 amps (65watts)
Comes with connector for direct plug-in into TIU
To purchase *click here*
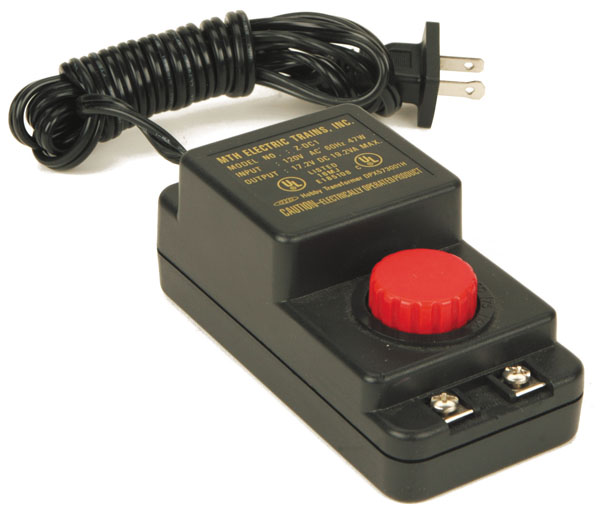
Z-DC1 (MTH power supply for HO) (MTH #40-200)
Provides variable DC power via throttle (20watts output)
To purchase *click here*
Z-DC24 (MTH power supply for HO) (MTH #50-240)
Provides variable DC power via throttle (20watts output)
To purchase *click here*
Bridgewerks:
Mini-Magnum 3s (3 amp)
Magnum SR-5, 10, 15 (5, 10, 15 amp)
Other DC power supplies work (See DCS Tips page for more info/discussion)
Photos of System components:
TIU & Wireless Remote: WTIU (Wi-Fi Track Interface Unit) AIU (Accessory Interface Unit): WIU (Wi-Fi Interface Unit): DCS Explorer:


Photos of Other System components/Options:
DCS Commander/Controller: (*Discontinued*) DCS Remote Commander: 100watt AC Power supply (#40-1000a):
MTH is unique in being the only manufacturer to produce a proper up-sized smoke unit specifically for G scale/One Gauge engines. These units are many times larger with larger fluid reservoir, fan impeller and fan motor which provides significantly better smoke output which can actually be safely maintained over long periods of time. Smoke units in all other G scale engines are O gauge sized units (like USA Trains, Aristocraft, etc).
MTH produced two G scale smoke units:
- Single stack unit for use in their One Gauge Diesels, Hudson, GS-4 and Triplex (Smoke fluid: Recommended up to 60ml. 180ml absolute maximum)
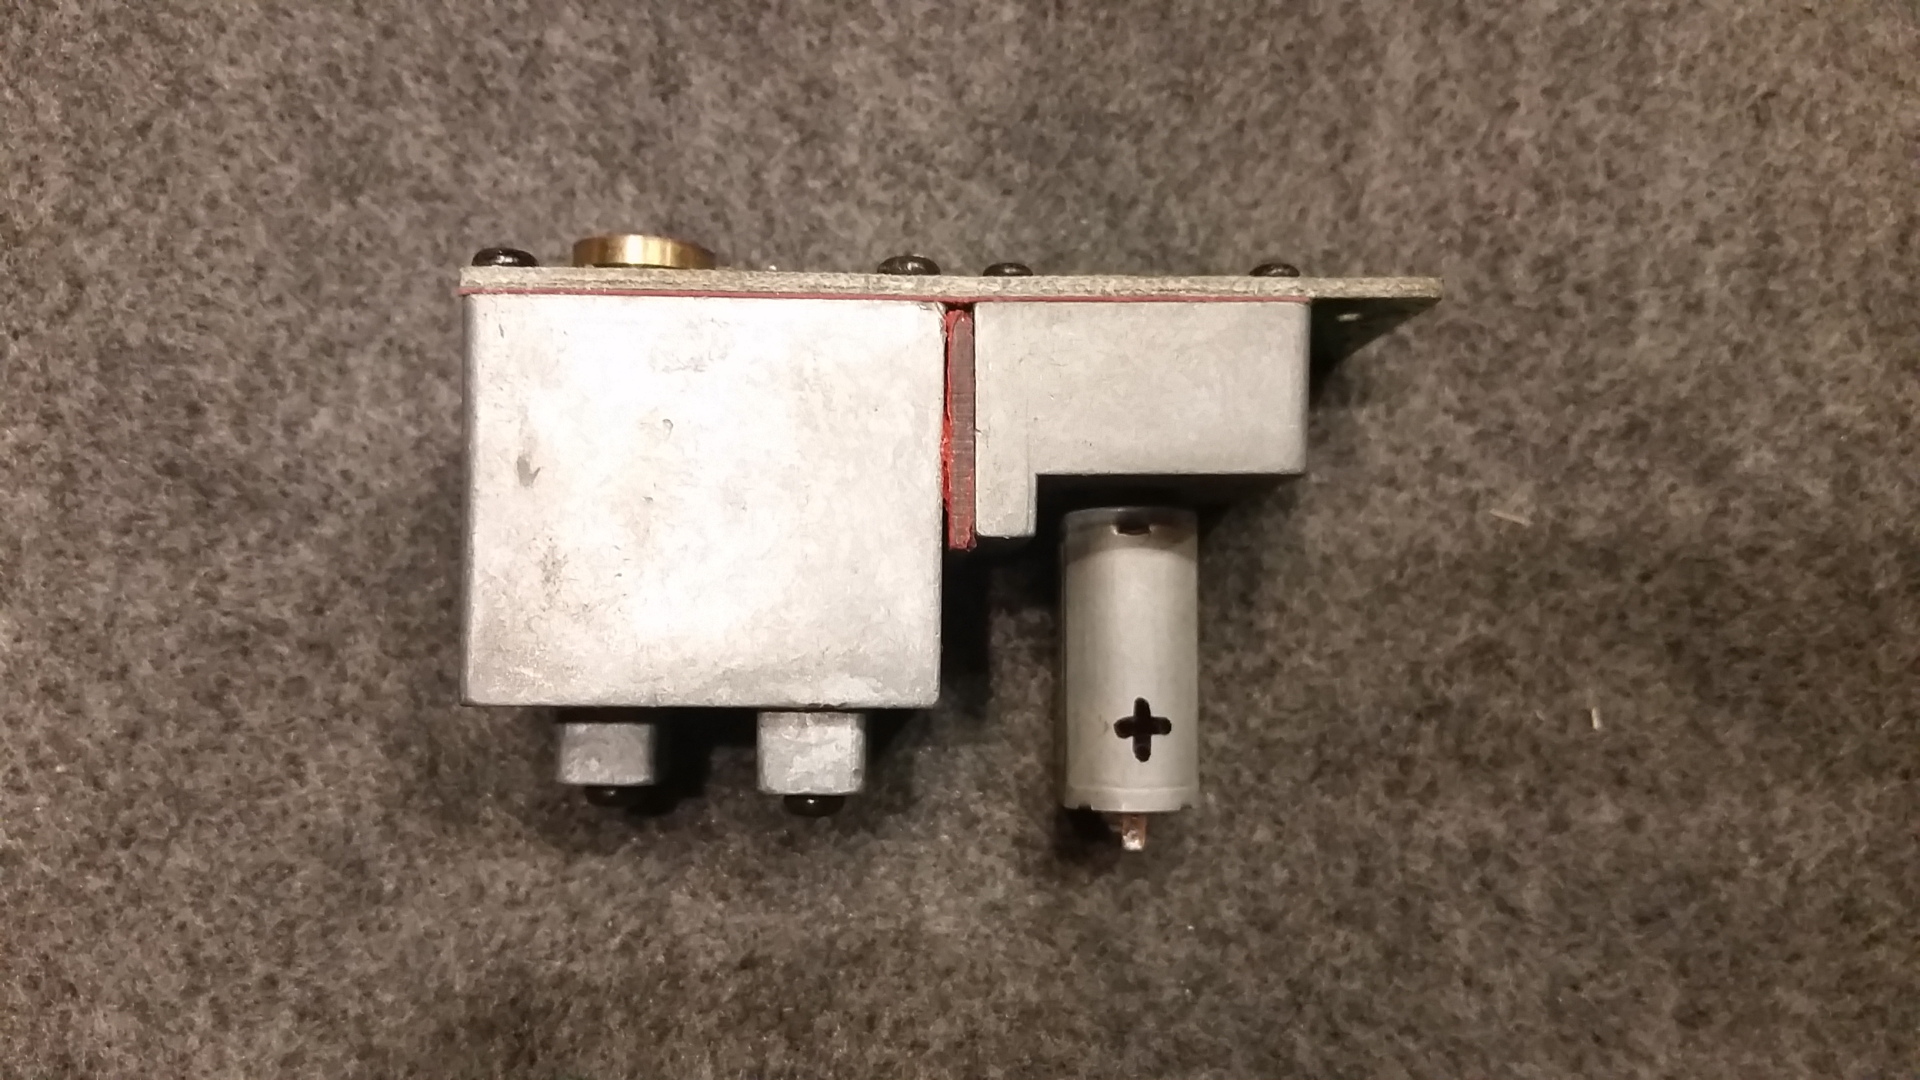
- Double stack unit for use in their One Gauge Challenger and Big Boy (Larger than one above and can hold more fluid)
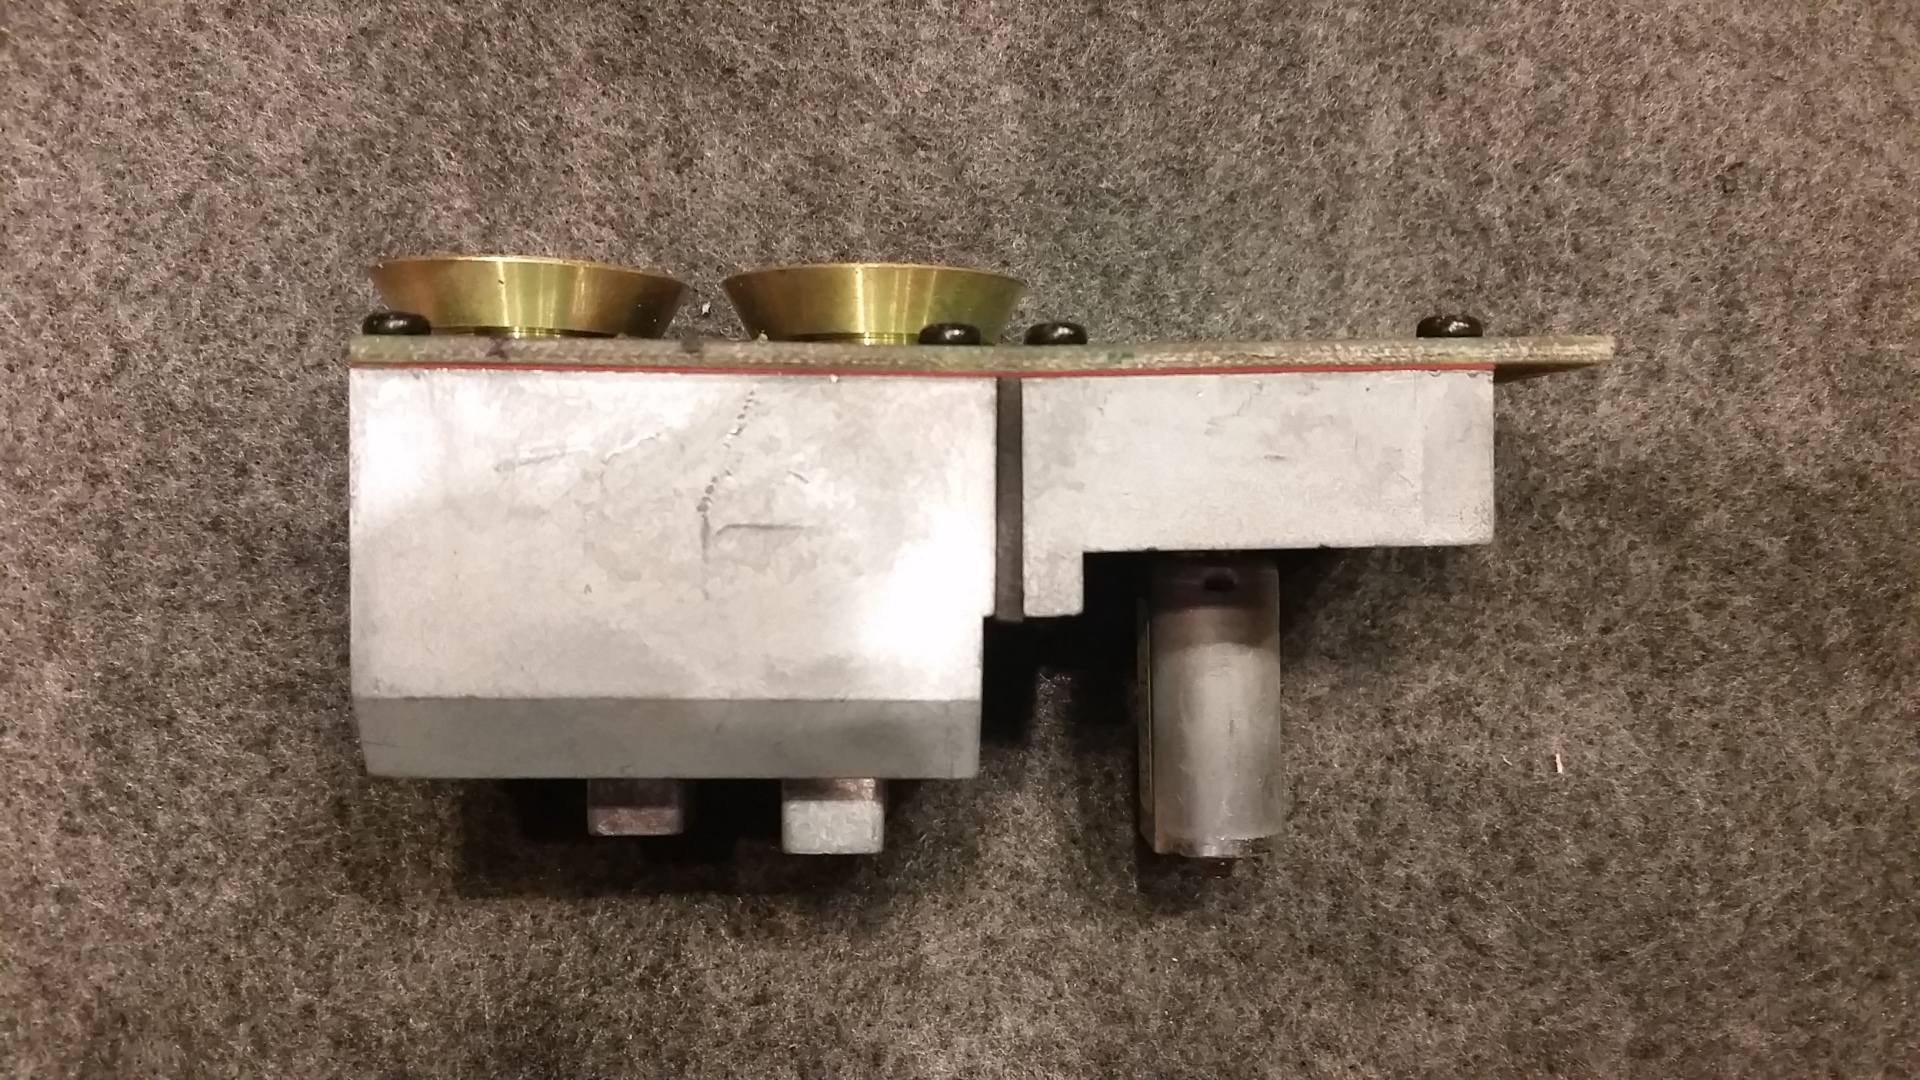
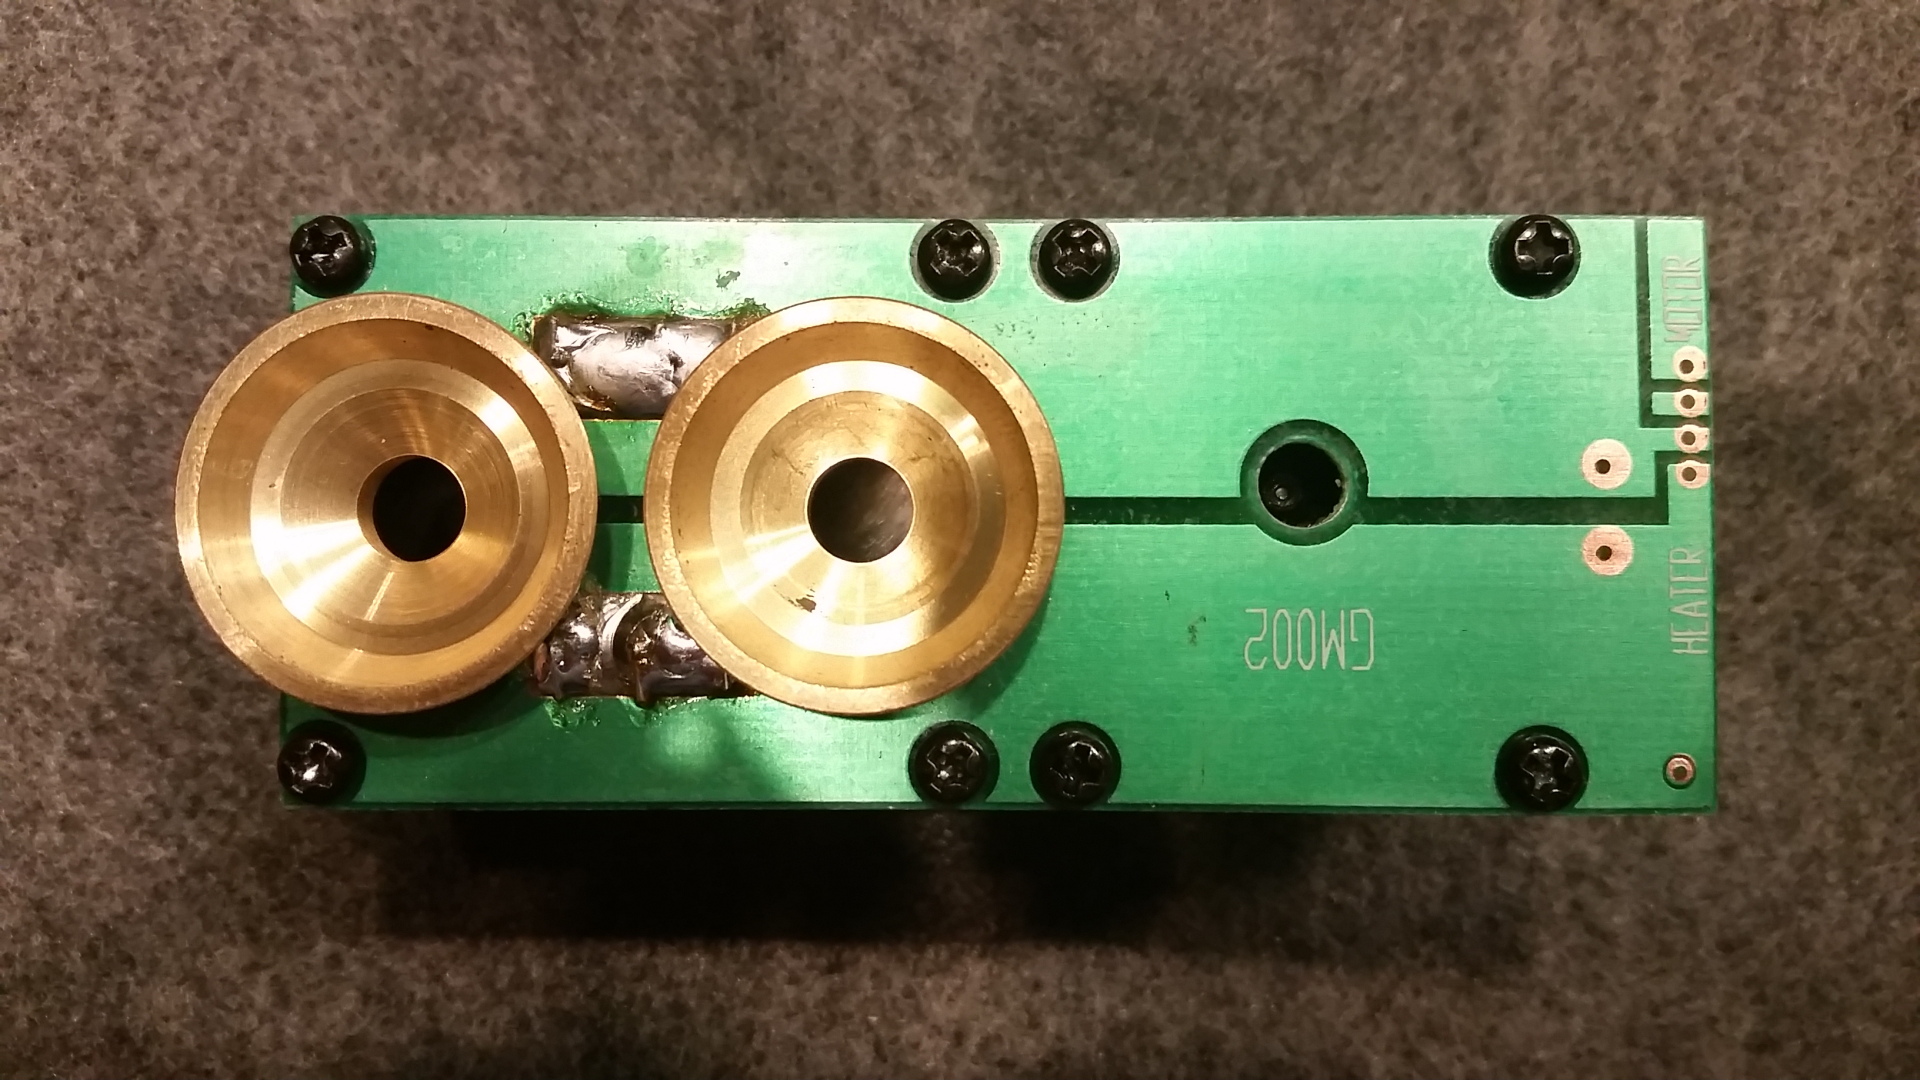
- Size comparison of MTH smoke units (note some variants are not included)
.jpg)
For more information on smoke units, their operation, specifications and comparisons see: Smoke Units
Why consider MTH DCS and Protosound 2/3?
Advanced features
Very intuitive & user friendly remote
Nothing to configure to get engine, features or speed matching working, just put engine on track and go
All factory MTH locomotives come already fully installed with sound, lights, smoke and advanced digital control right out of the box. Just put on the track and go.
All factory MTH engines have all metal gears and axles for long life and durability
Some key items and features to note:
Cost:
"PS2 Upgrade kits" which includes all you need for sound and control for your engine is only $184 (for self-install)
Note: PS3 kits which have DCC compatibility is coming soon.
MTH engines already come fully equipped with Protosound installed (lights, control and sound)
The TIU and Remote only cost ~$309 (which is all you need to control your engines) (Power supply required)
Running the TIU in "Passive mode" allows you to run without any amperage limitations. So one $179 TIU can run unlimited number of trains. This results in big savings on equipment compared to other forms of digital control. (I've run 30+ amps)
Sound & Sound Quality: Sounds excellent and has a wide number of sound options available.
Smoke system: Best on the market and is always perfectly synchronized with sound chuffs because of the use of an optical reader and is always 100% accurate unlike magnet or mechanical activated chuff triggers in other systems. See sample videos on my videos page.
Speed Control: Utilizes an optical reader that actively reads motor speed to adjust power to the motors to precisely control/maintain chosen engine speed. Each engine will actively maintain the dialed speed, regardless of any variations in track voltage (unlike DCC). Click here for more info This allows for flawless running multiple engine consists with pusher engines. All engines from the factory are already precisely speed matched to run in consists. (see the video demo)
- Video #14 - 3:41 mins - 4 NS + 1SF Dash-9s pull the 60 car coal train
- 56MB/2100kbs - 28MB/1000kbs - 4MB/150kbs
User experience: For me this is where DCS stands out... it completely changes the user experience of running trains all through your remote. Of all the other remotes/systems I've used, it's the most user friendly I've seen out there. The remotes for most control systems are populated with simple numbers and direction arrows with no indication of what they're used for and on screen display indicator are either simple LEDs or are cryptic. With the DCS remote you can read in English what buttons do, you pretty much don't need to read the manual to get started.
VOLUME CONTROL: sound volumes (Bell, Whistle, Engine, Cab chatter) can all be individually adjusted from a scale of 0-100% (10% increments)
LIGHT CONTROL: turn lights on/off (cab, headlight, marker lights, number board lights, firebox lights) with the press of a button
SMOKE: Turn smoke on/off, Control smoke volume (Min, Med, Max)
As noted, all 2013 and later production MTH One Gauge engines will come equipped with PS3 which has DCC compatibility built in so you can run with your other DCC equipped engines. See below for DCC control info:
Maintenance odometer: Never have to guess when your engine next needs maintenance. Each engine tracks it's own usage and will display (upon engine start-up) a reminder on the remote when when it's time to perform maintenance.
Track Voltage: Instantly find out what the track voltage is at the spot your engine is at right then. This is helpful if you want to quickly check to see if there is power problem. No need to grab your volt meter.
Usage Odometer and clock: Buying a used engine? Always know how many scale miles or hours of usage an engine has been run. (cannot be reset)
Engines can operate on just variable track power: If you don't want to run with the remote, just put the engine(s) on the track without the TIU connected and apply track power and use your throttle.
You can still activate the bell and whistle running on variable track power with the remote.
Remote is software upgradeable: Meaning additional features and enhancements will be periodically released typically from user feedback. These updates are always Free.
These are just a just a few key items, see the overview video series below for a more detail review.
*** One note for non-MTH engines: To obtain this level of optical control precision, the system does require a flywheel installed somewhere on the drive-train. It is required in order to function and not all non-MTH engines come with a flywheel already on the drive train requiring some additional install effort. ***
__________________________________________________________________________________
Overall DCS Overview:
Part 1
DCS Overview - (Part 1 of 5) - Youtube - Youtube HD - File Download HD 13:45 mins
Using DCS System with DCS Wireless Remote:
Part 2
DCS Overview - (Part 2 of 5) - Youtube - Youtube HD - File Download HD - 11:10 mins
Part 3
DCS Overview - (Part 3 of 5) - Youtube - Youtube HD - File Download HD - 13:32 mins
Part 4
DCS Overview - (Part 4 of 5) - Youtube - Youtube HD - File Download HD - 15:17 mins
Part 5
DCS Overview - (Part 5 of 5):- Youtube Part 5 (1of2) - Youtube HD (1of2) - 9:58 mins
- Youtube Part 5 (2of2) - Youtube HD (2of2) - 5:30 mins
- File Download HD (Part 5 complete) - 15:29 mins
Using DCS System with Wi-Fi Interface and DCS
App:
*Please note this video is of the Standard version ($5.00) of the App. The Premium version of the App ($25.00) which duplicates all functions of DCS will be released in 2017*
*Click here for Detail Information & App release status*
PFA (Passenger/Freight Announcements): (This is an added sound sequence feature not shown in the overview video series above.)
PFA or Passenger/Freight Announcements is a feature that you can trigger by pressing the PFA button on the DCS remote. This starts a series of 5 sound sequences that are played one at a time that are manually advanced from one sequence to another by pressing the red DIR button (Change direction/Reverse). You press the PFA button, then wait for the sound sequence to finish, then press DIR, wait for that sequence to finish and so on. Once you are at the end of the last sequence the engine bell will sound, just wait a few moments, then you will be able to adjust the speed on your engine again. You won't be able to change or control the speed of the engine or start it moving until after the PFA sound sequences are complete OR you press the PFA button again to exit/stop the feature.
Note:
- For engines that are moving: If you press the PFA button it will start the feature. The first time you press the DIR button, the engine will come to a stop and the next PFA sound sequence will start.
You won't be able to start the engine moving again till after all the sound sequences are complete.
- For engines in a Lash-up: This feature works exactly the same as described in the first bullet.
- You can press the PFA button at any time to exit/stop the PFA feature/sequences.
Video demonstrations:
Passenger/Freight Announcements Video 1 of 3:
Passenger/Freight Announcements Video 2 of 3:
Passenger/Freight Announcements Video 3 of 3:
Protocast feature: This allows you to connect a CD or MP3 player into the TIU and play music through your engine's speaker. (great for Christmas or Halloween trains)
MTH_DCS_Protocast_Video_1_2100kbs.wmv
- 41mb
MTH_DCS_Protocast_Video_1_1000kbs.wmv
- 20mb
MTH_DCS_Protocast_Video_1_150kbs.wmv
- 3mb
MTH_DCS_Protocast_Video_2_2100kbs.wmv
- 18mb
MTH_DCS_Protocast_Video_2_1000kbs.wmv
- 9mb
MTH_DCS_Protocast_Video_2_150kbs.wmv
- 1mb
MTH_DCS_Protocast_Video_3_2100kbs.wmv
- 50mb
MTH_DCS_Protocast_Video_3_1000kbs.wmv
- 24mb
MTH_DCS_Protocast_Video_3_150kbs.wmv
- 4mb
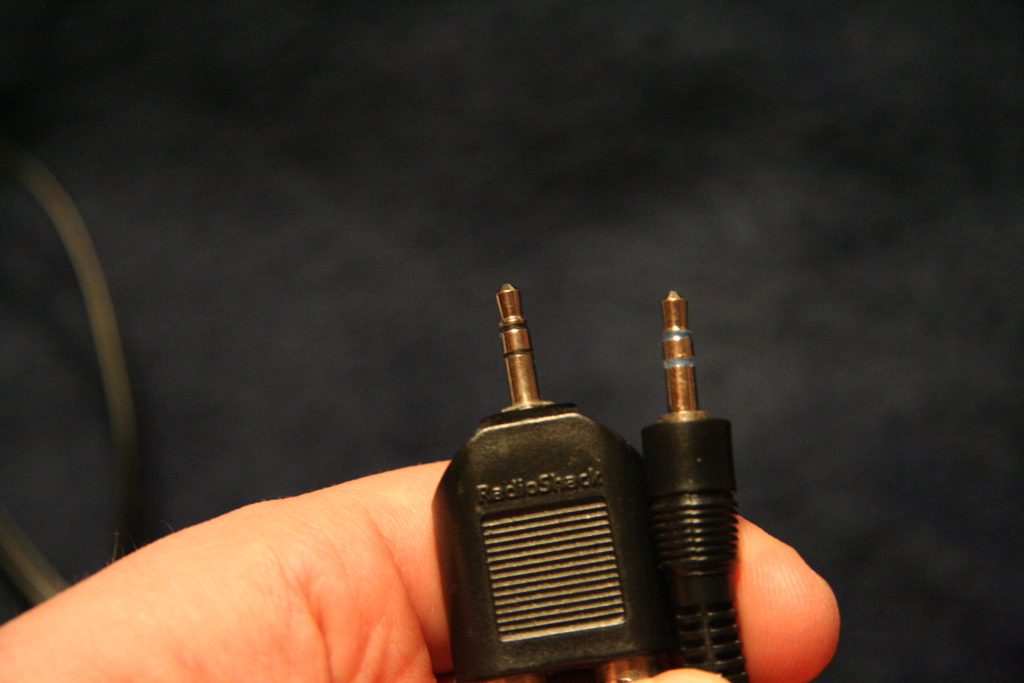
To playback music/audio with the Protocast feature, insert a 3.5mm stereo male audio cable end into the Protocast port on the TIU. Plug the other end into the audio output of your favorite audio source. Select the engine you want to play the sound an press the Protocast button (also the number 8) on the remote.
|
|
|
||
Proto-Dispatch feature: This allows you to connect a separate microphone (wired handheld or wireless headset) and talk through your train's speaker with your own voice when you select MENU -> SOUND -> EXTERNAL MIC. Just plug your microphone (3.5 mm plug) into the Proto-Dispatch port on your TIU. (You can also use the built in Microphone in the remote and press the MIC button.)
|
|
|
||
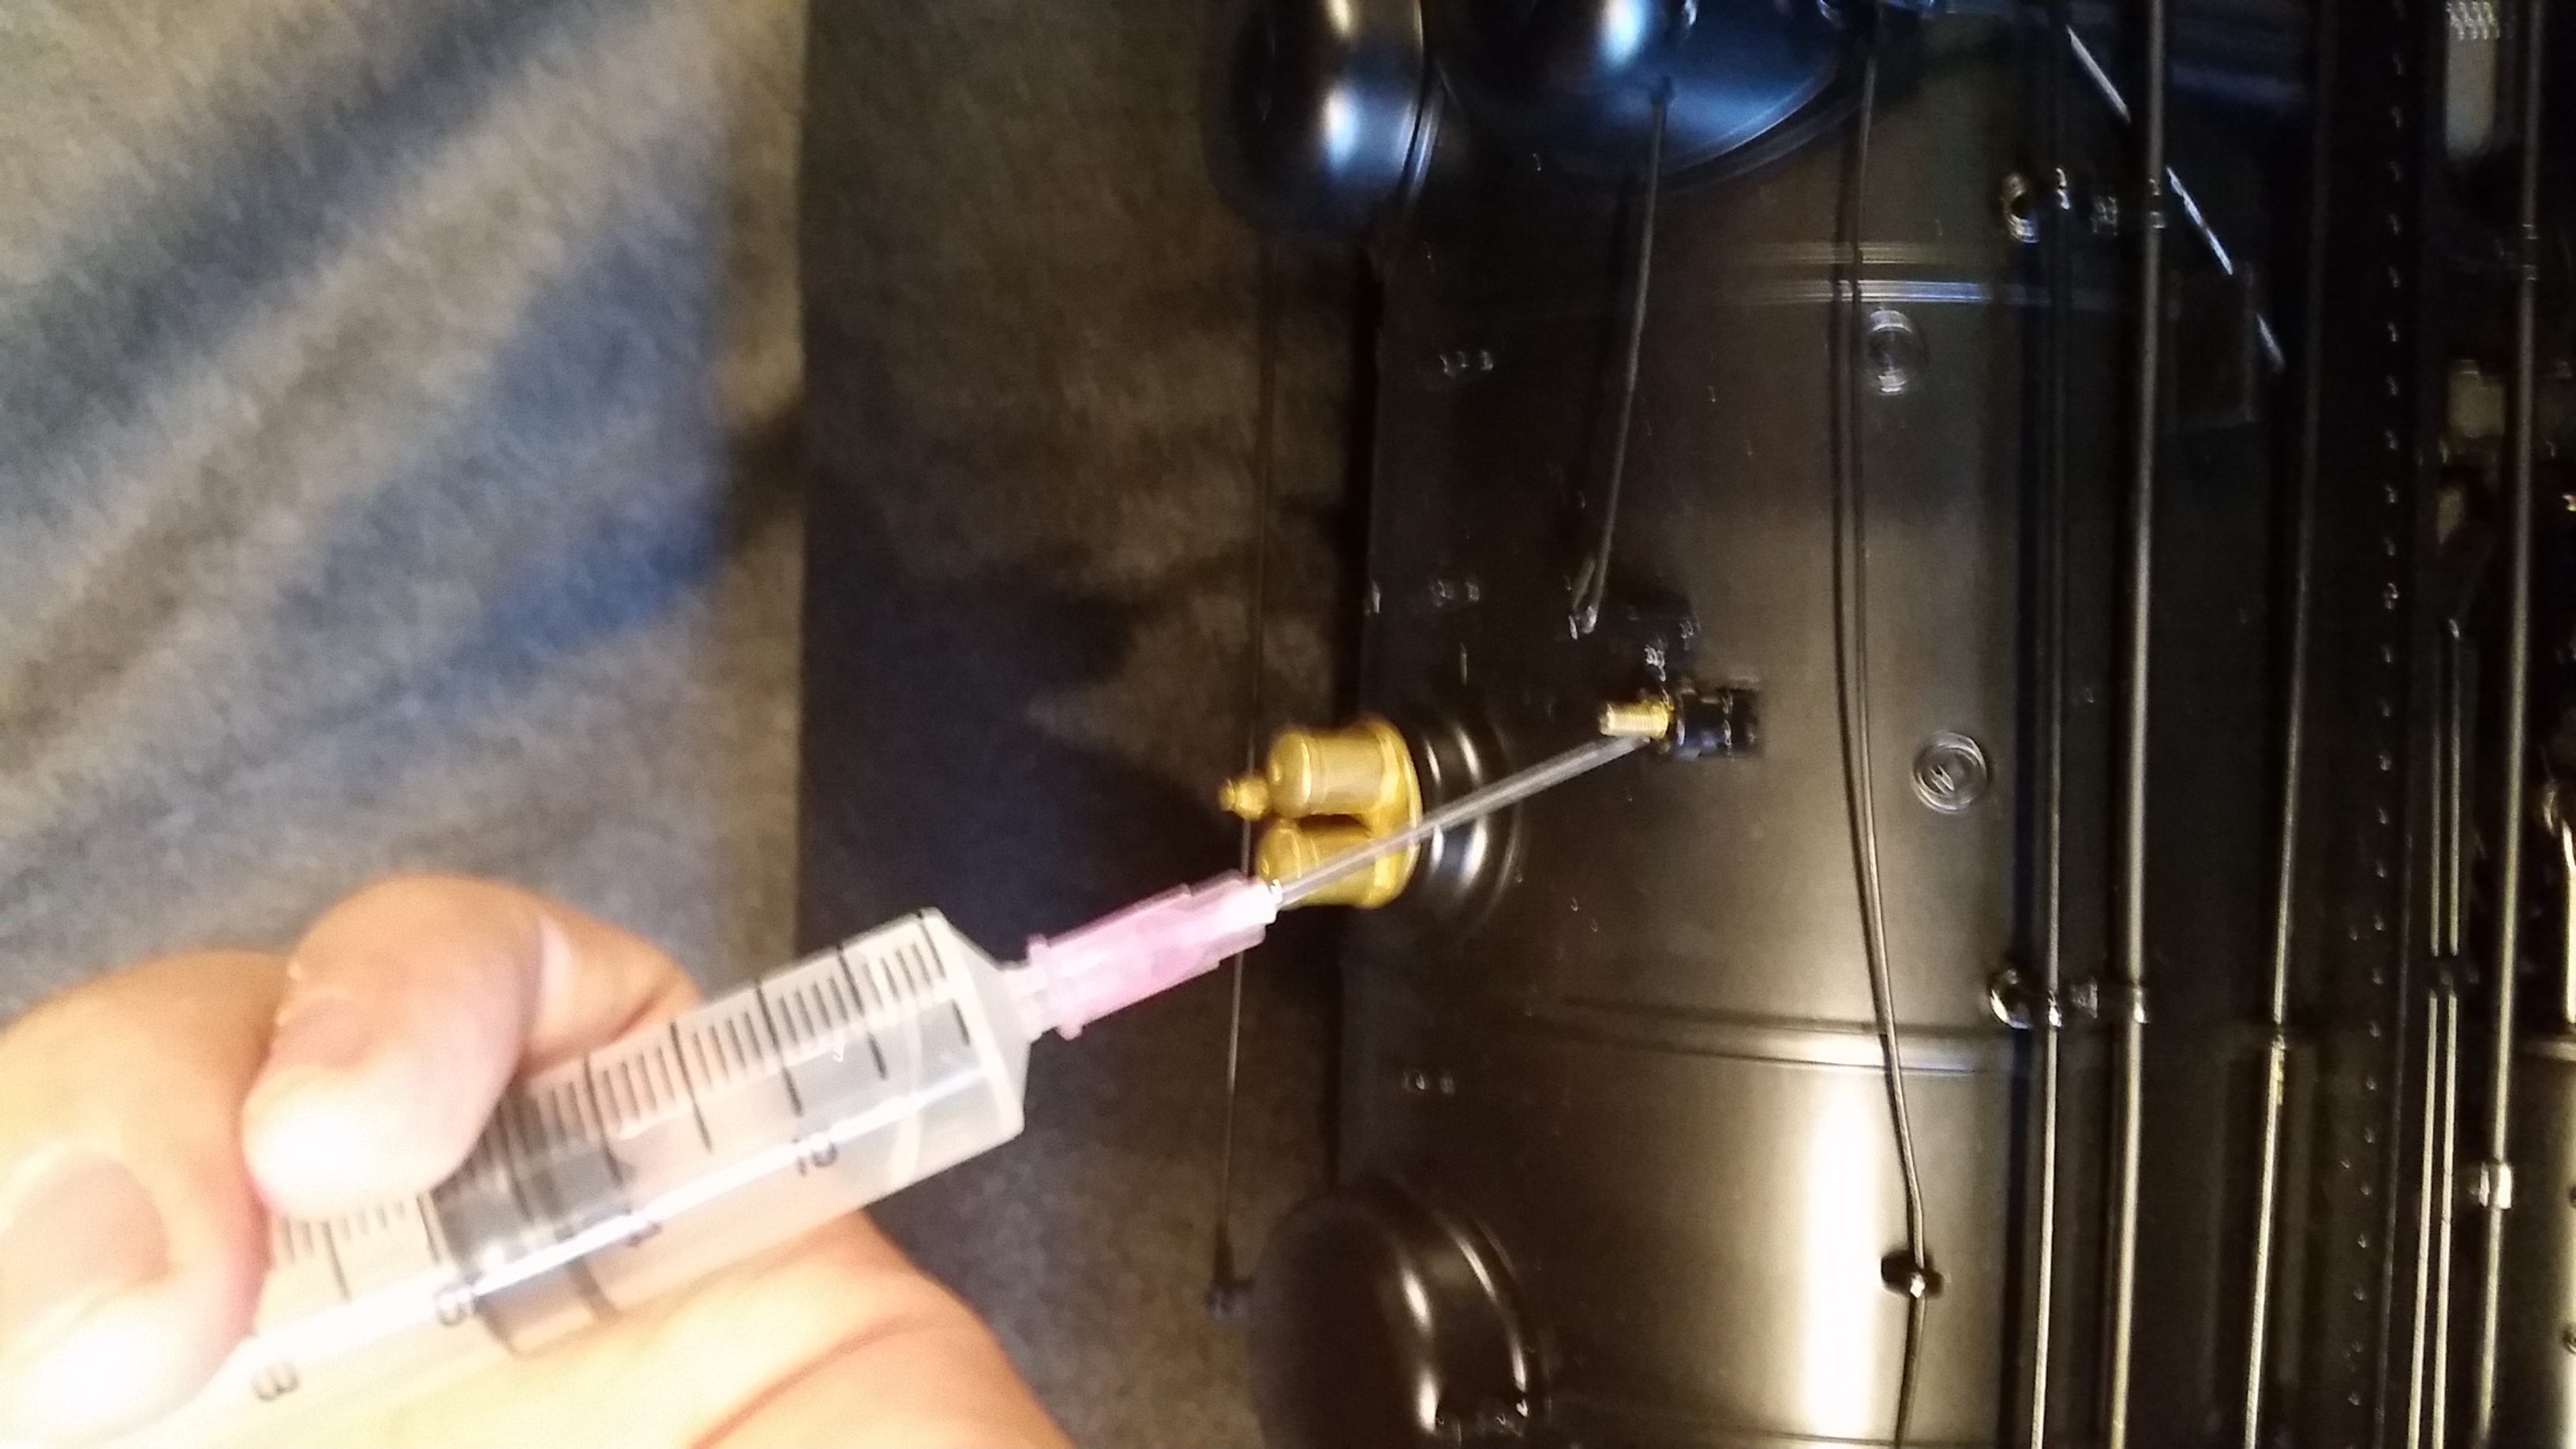
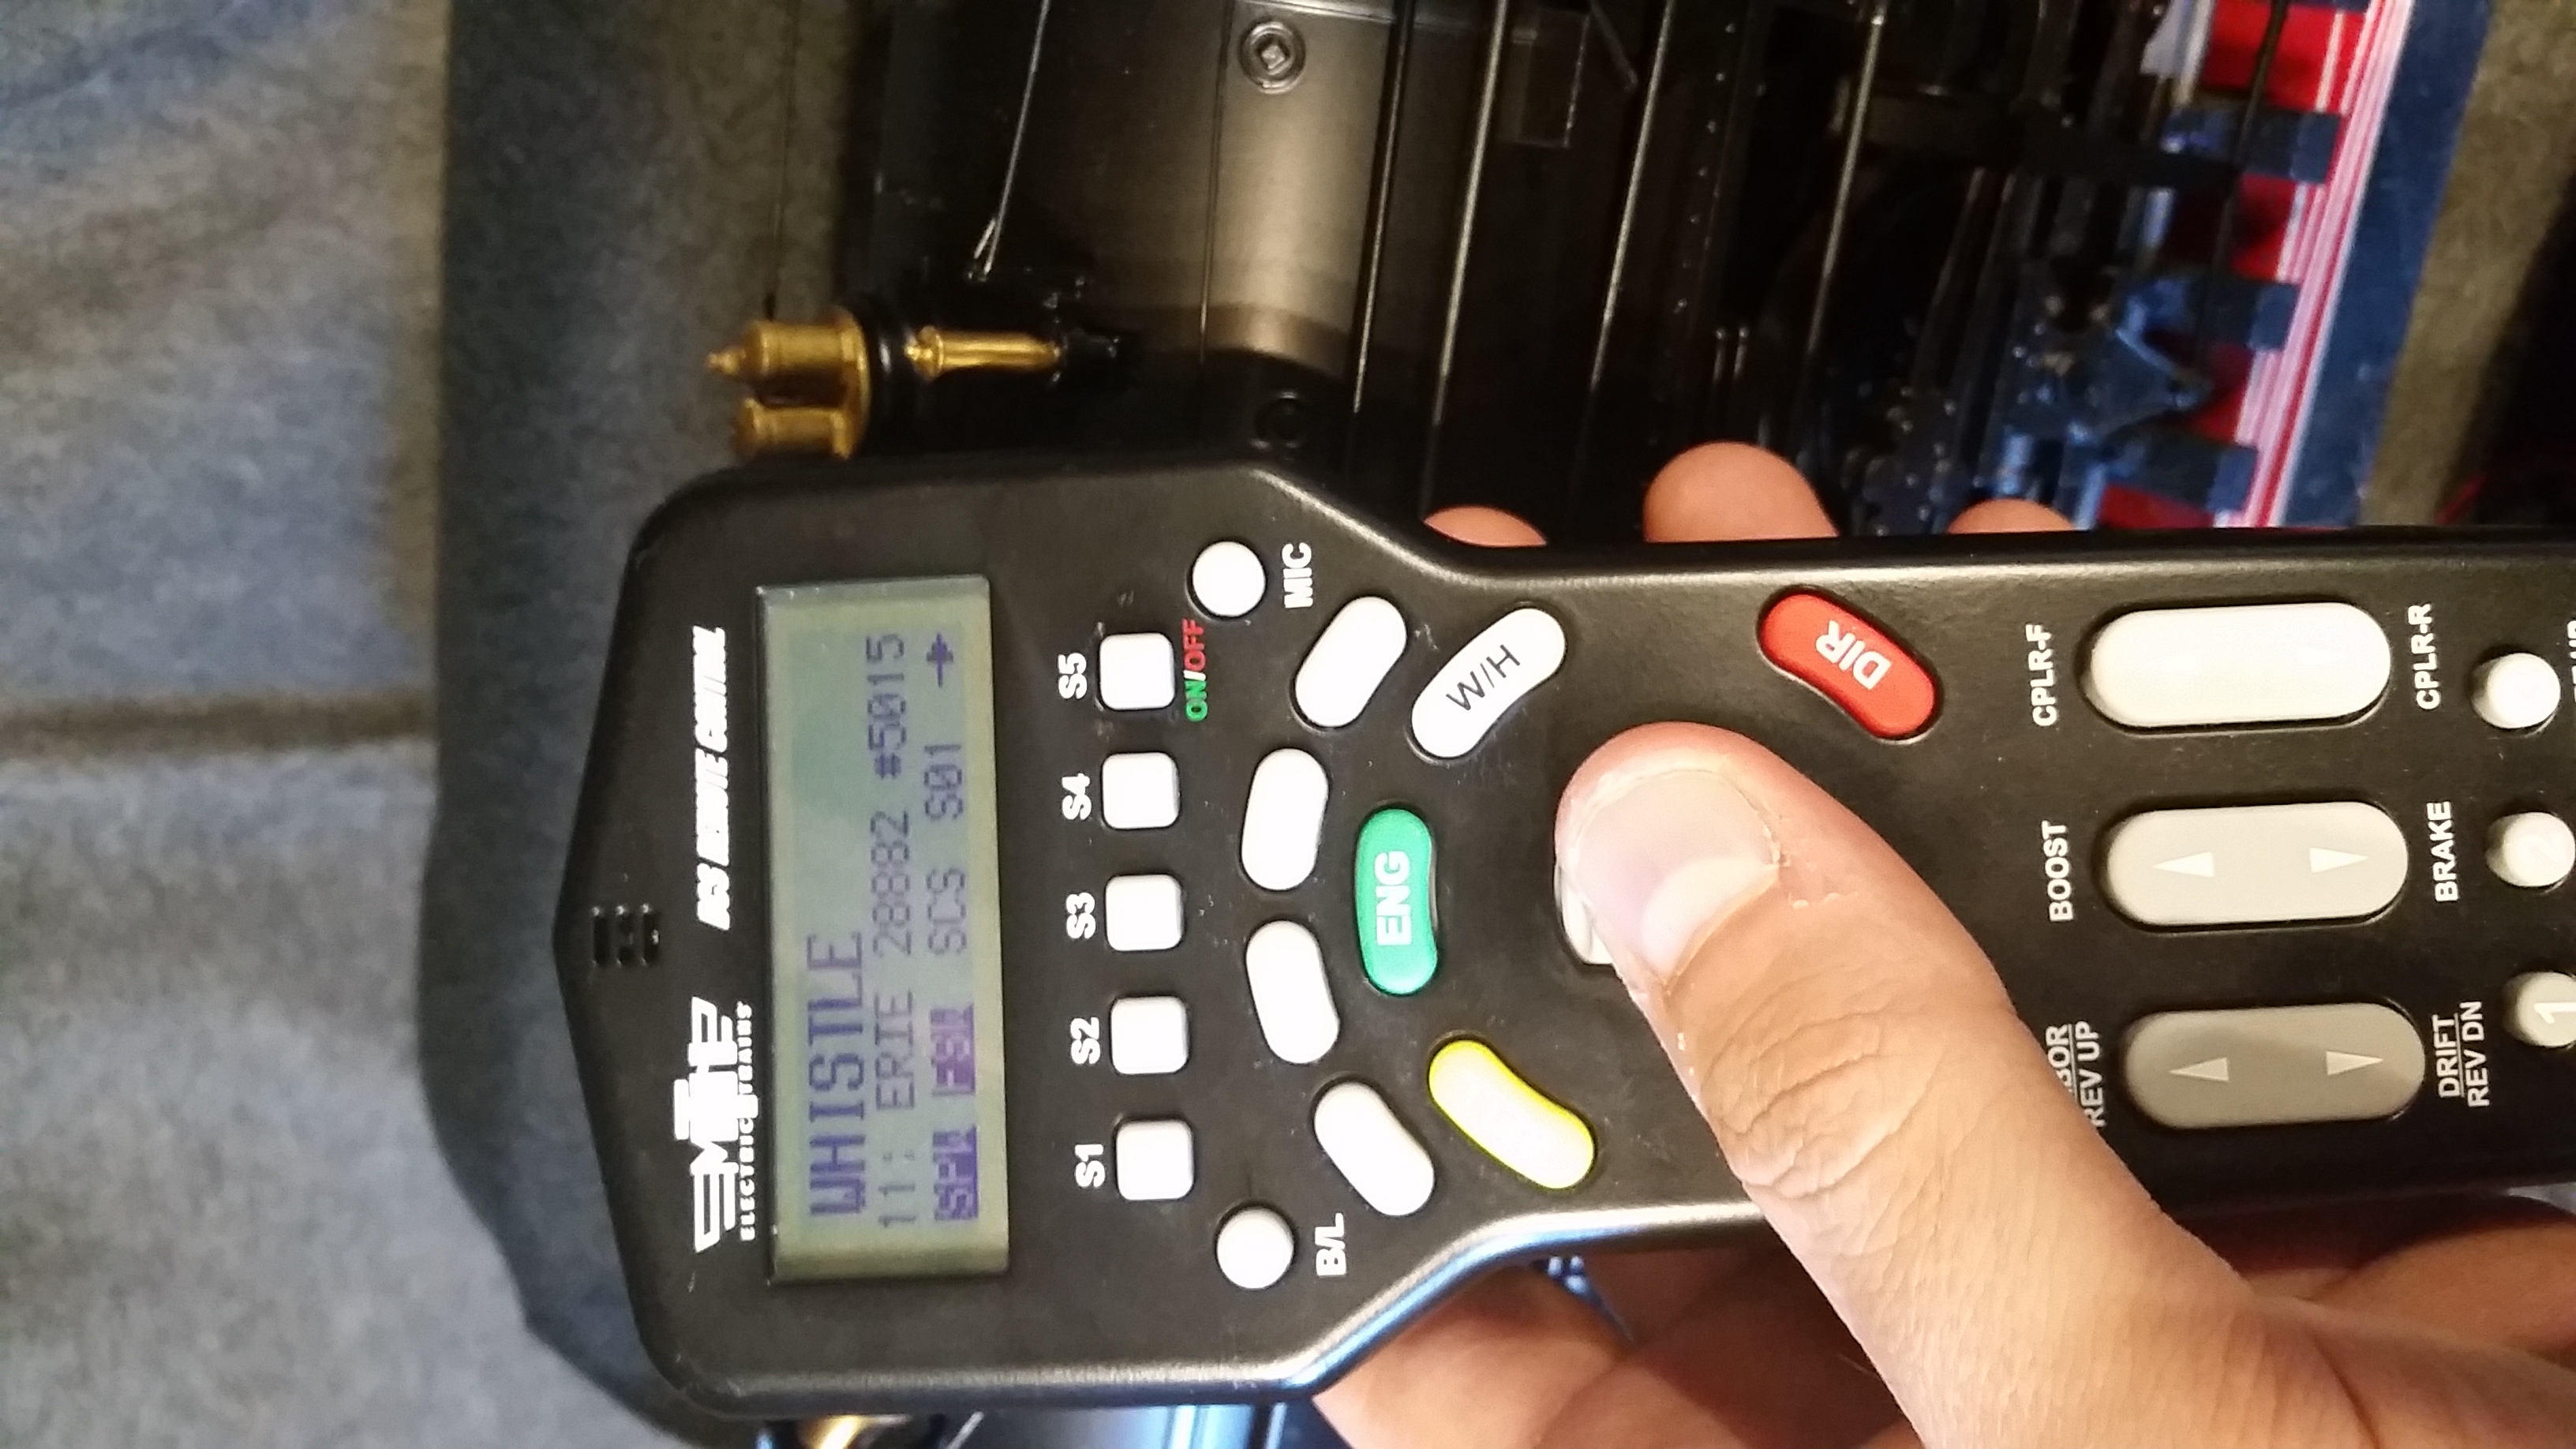
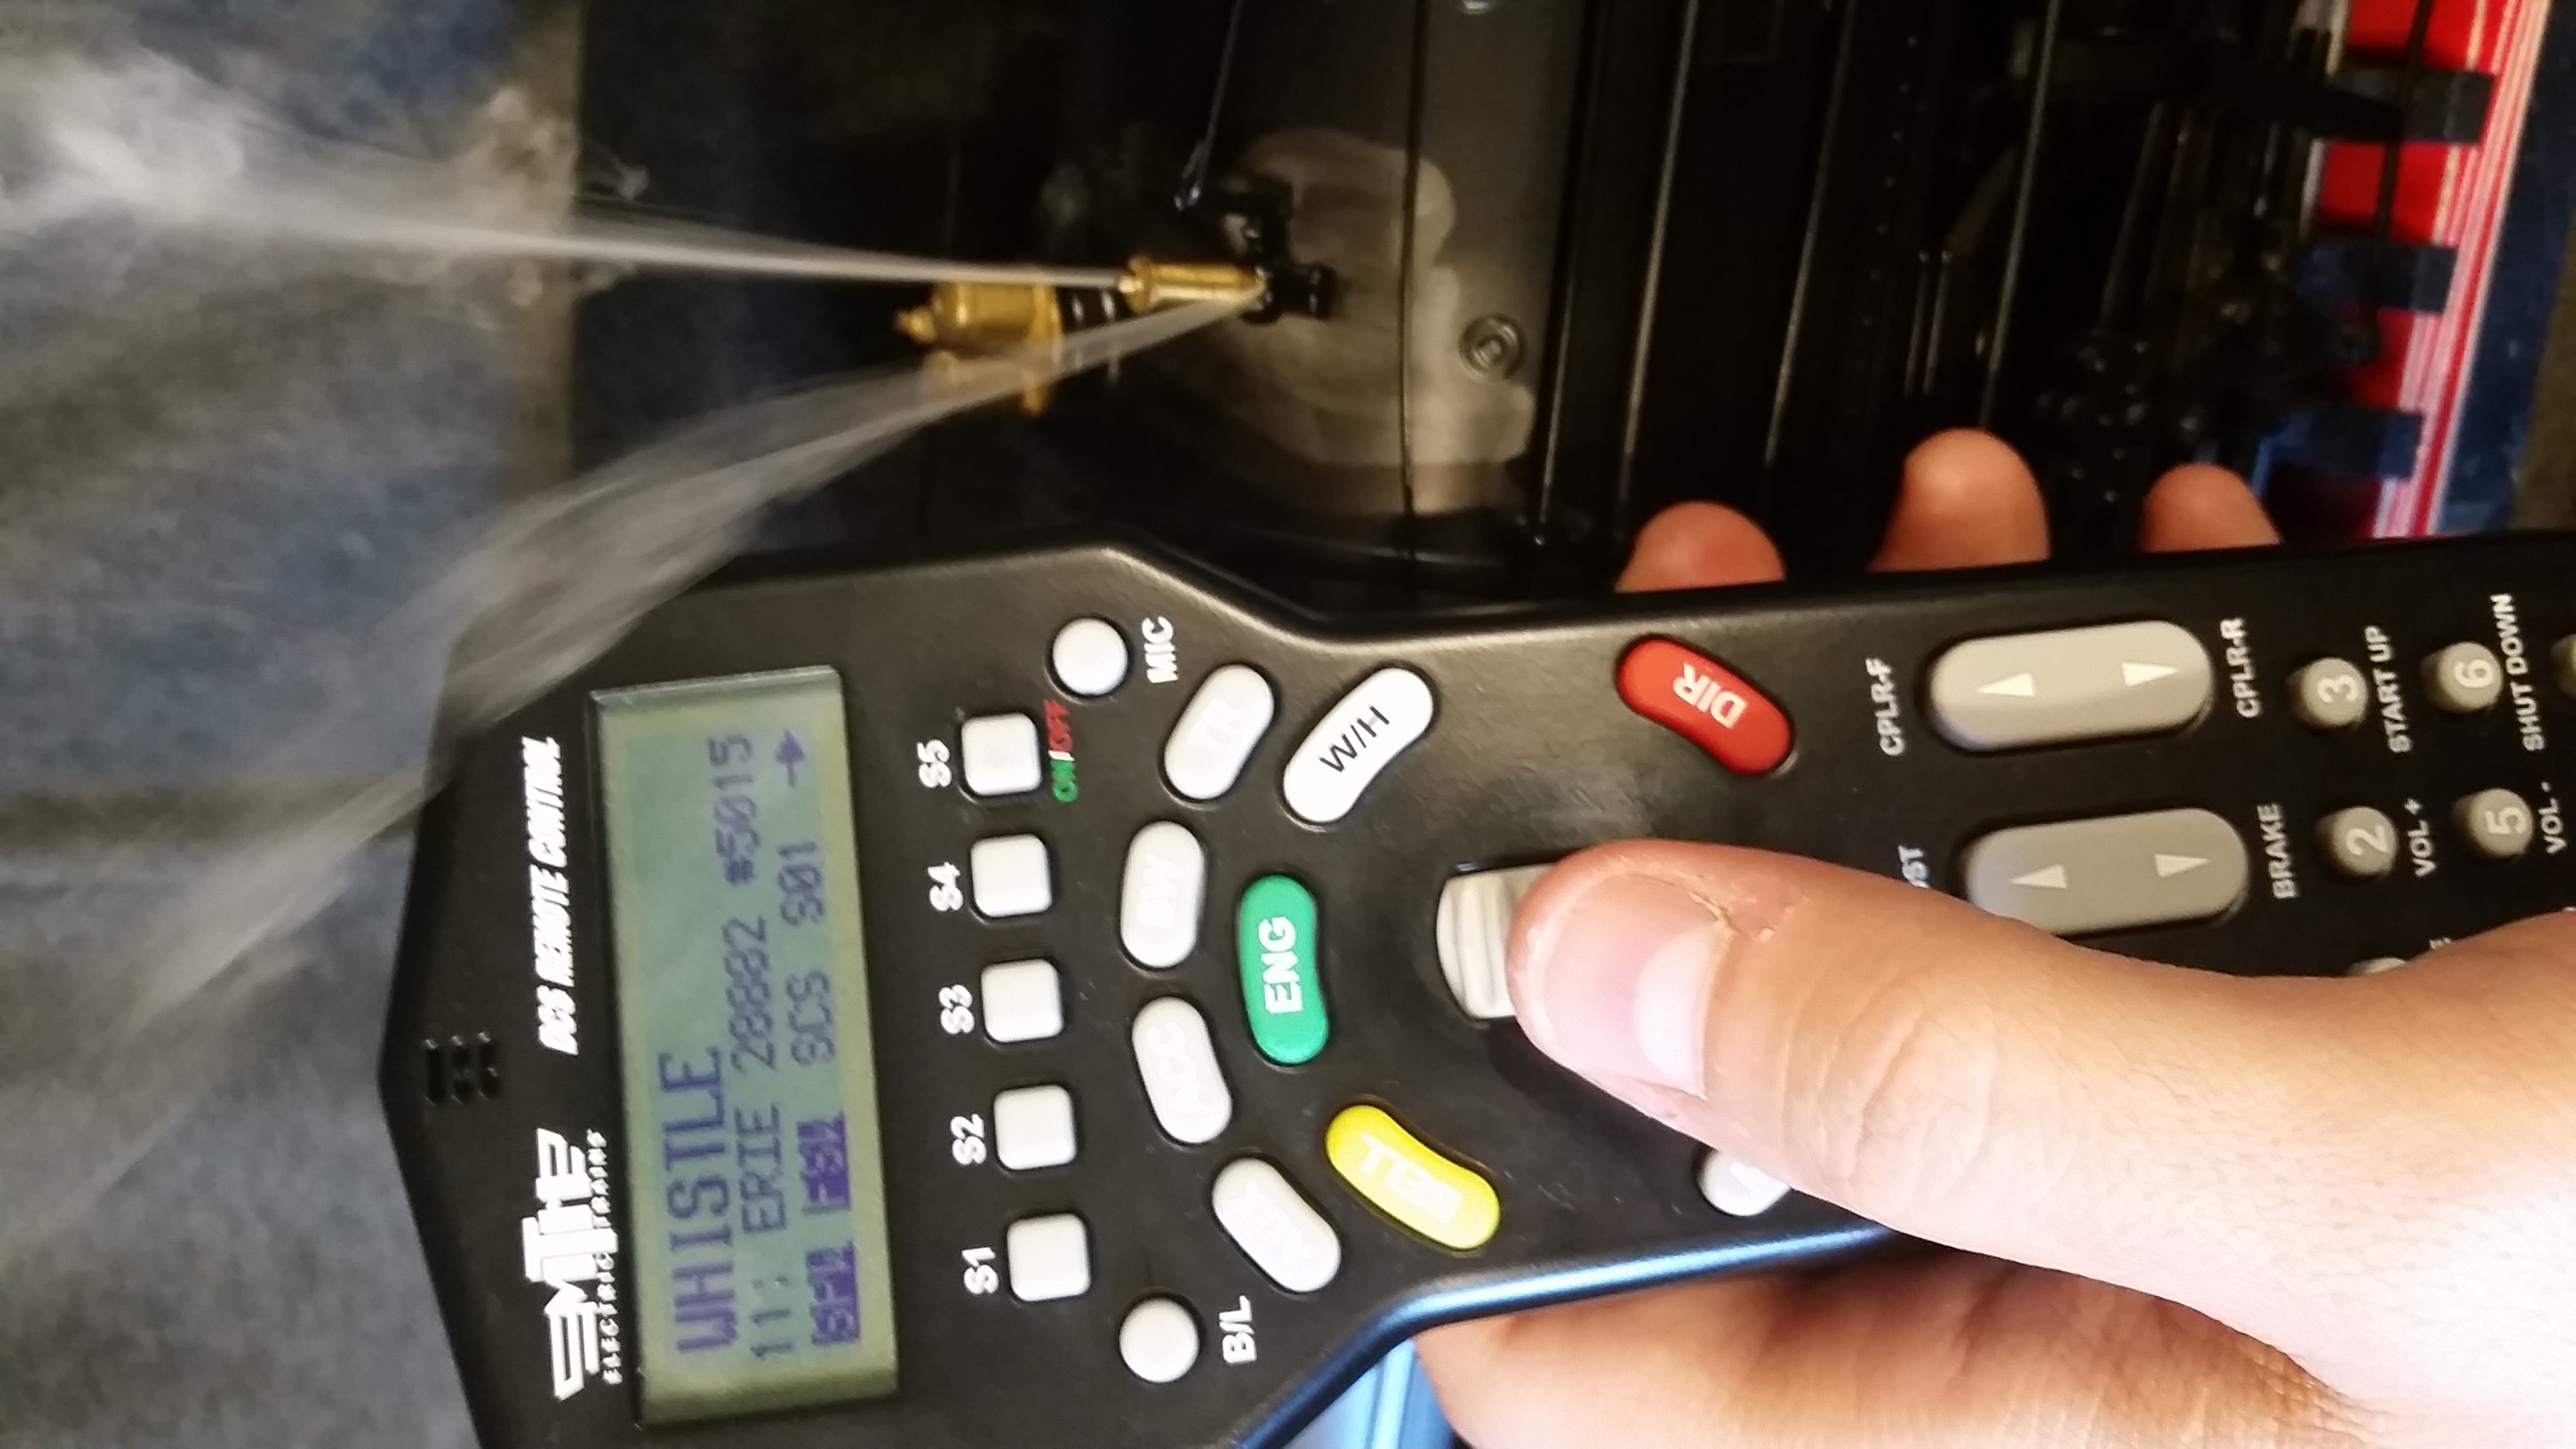
Smoking / Playable/Quillable Whistle: Instructions on how to activate: (For engines equipped)
Do the following steps to activating the smoking / Playable/Quillable whistle:
Smoking + Playable/Quillable whistle:
To turn Smoking & Playable/Quillable Whistle off:
- Step 1: Add 6 drops of smoke fluid into the whistle opening (remove the brass whistle first)
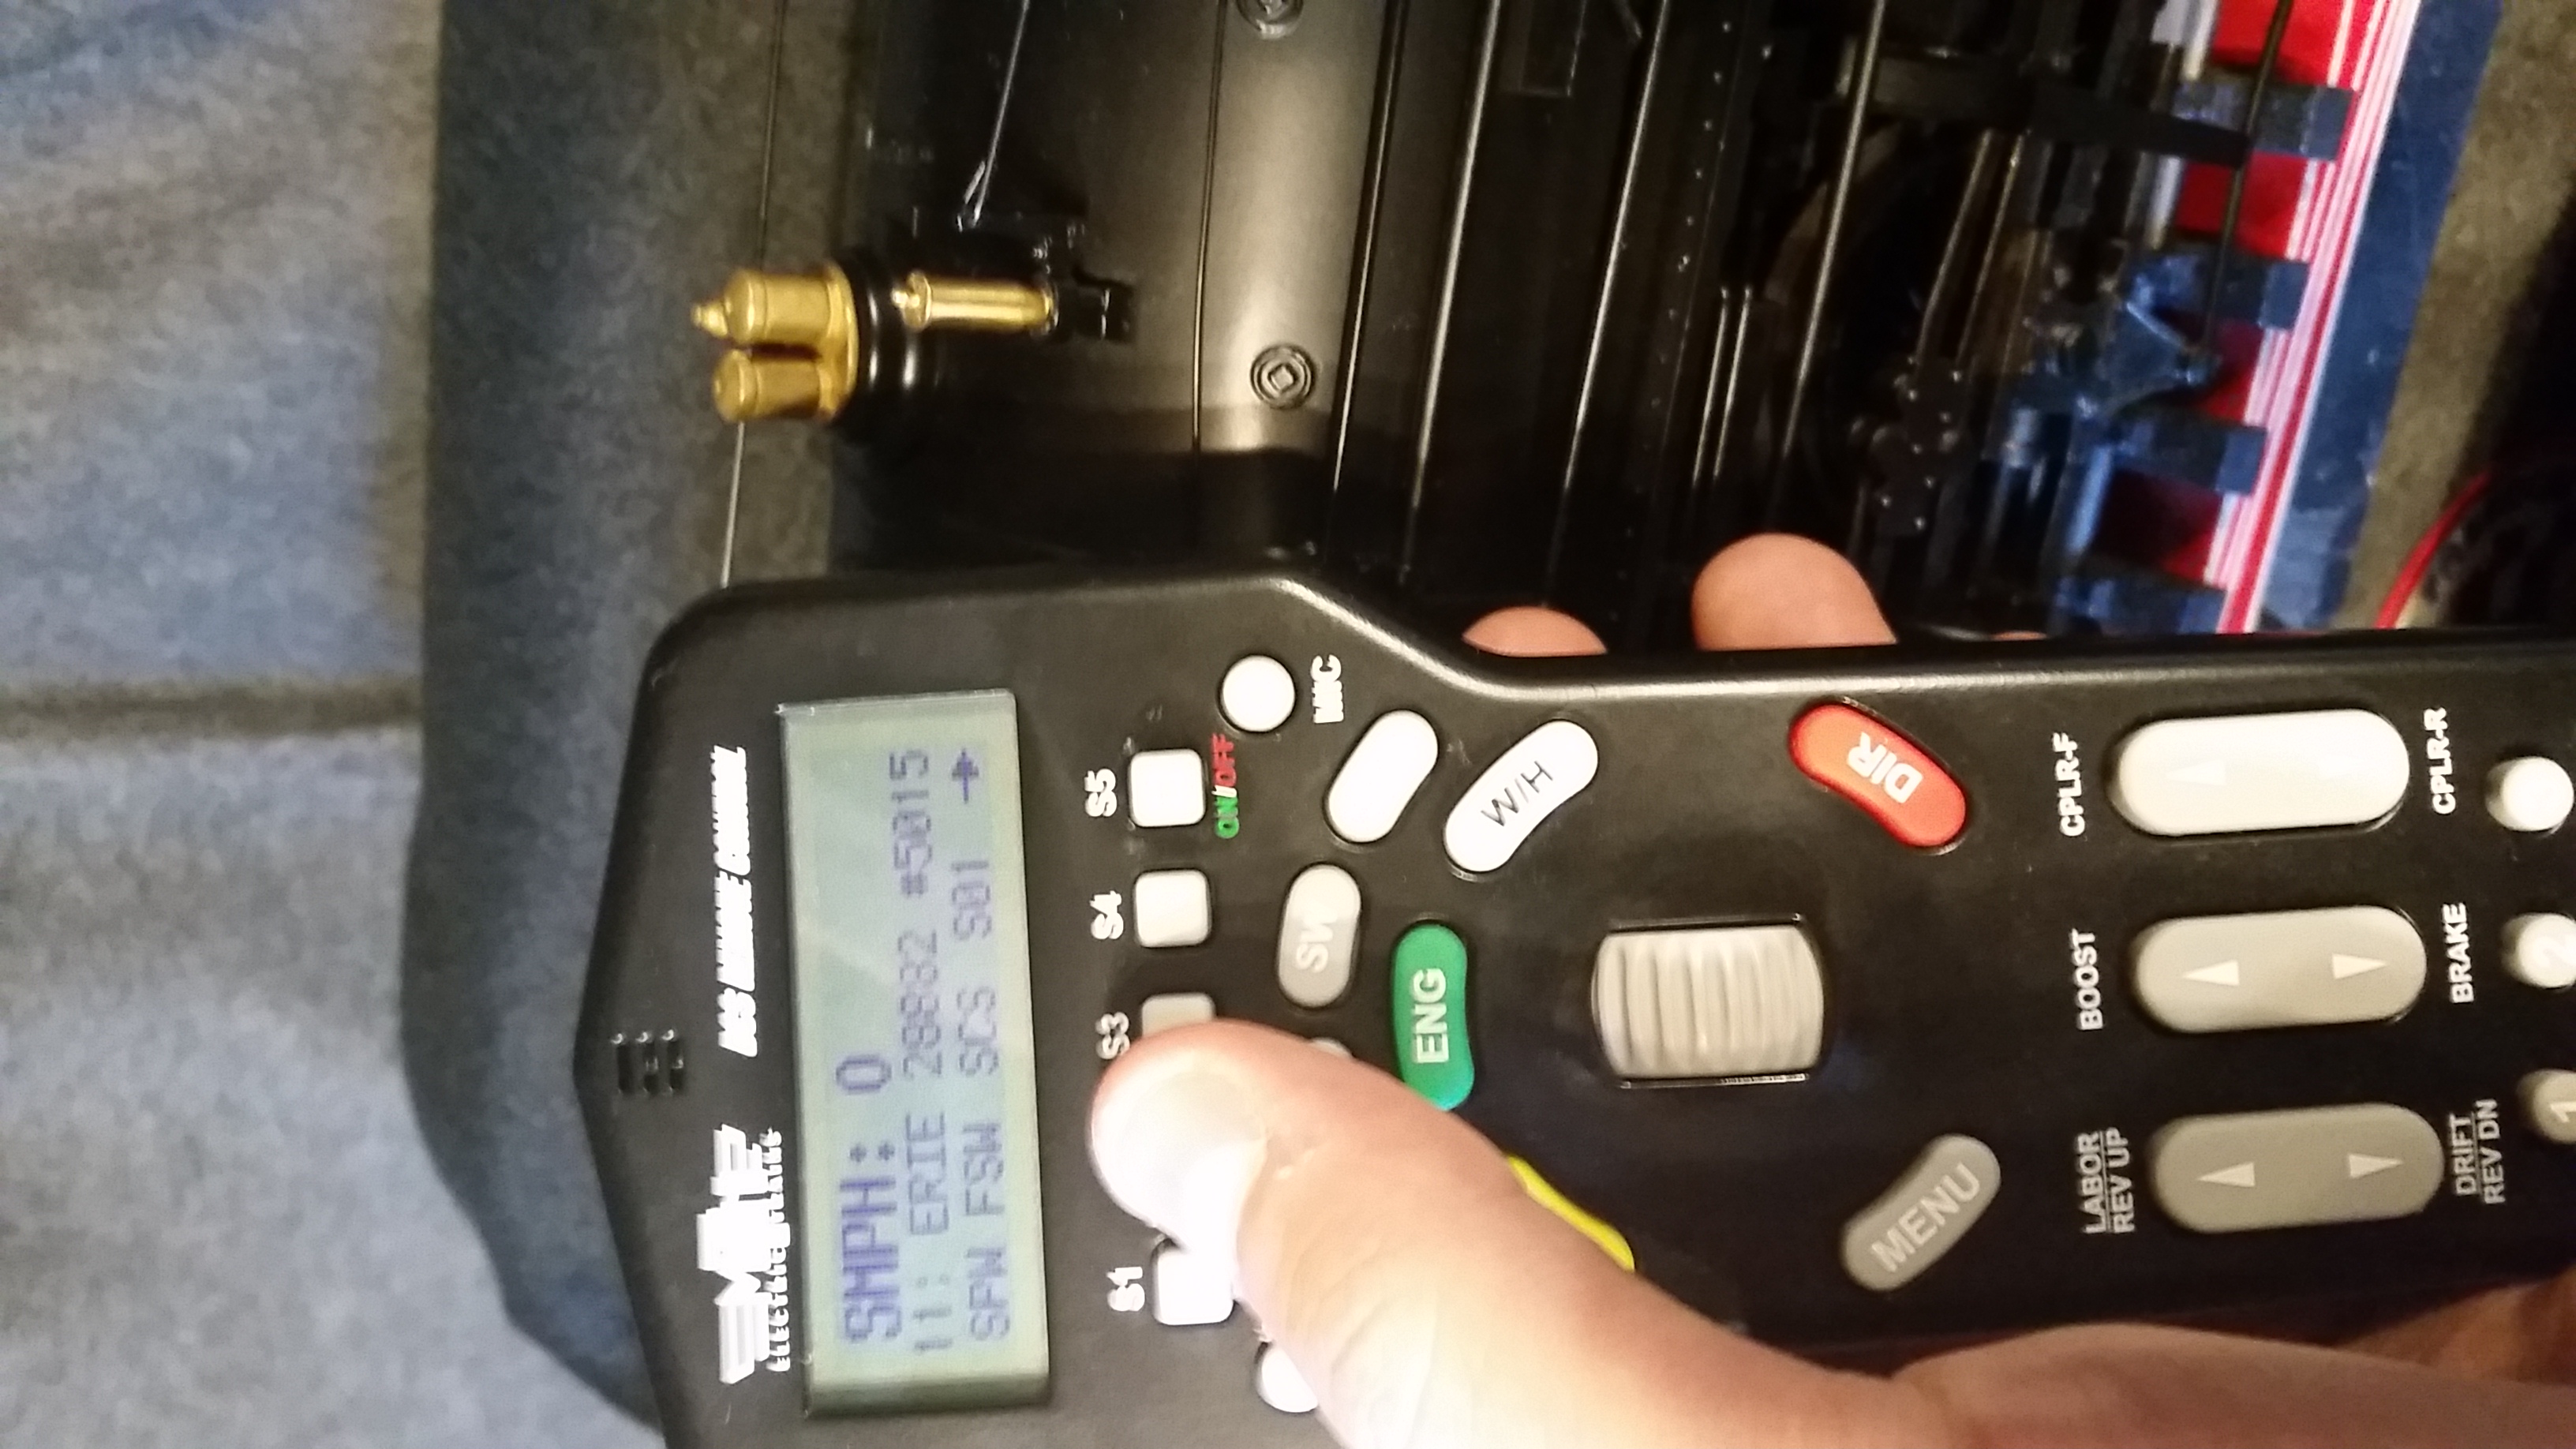
- Step 2a: Press "S2" (FSW) button - (FSW=Feature Smoking Whistle -- This turns on the smoke whistle heater)
- (Note: You may need to scroll the softkey list with "S5" button to display SPW and FSW labels)
- Step 2b: Turn thumbwheel down - (This updates the screen to confirm FSW is highlighted/activated)
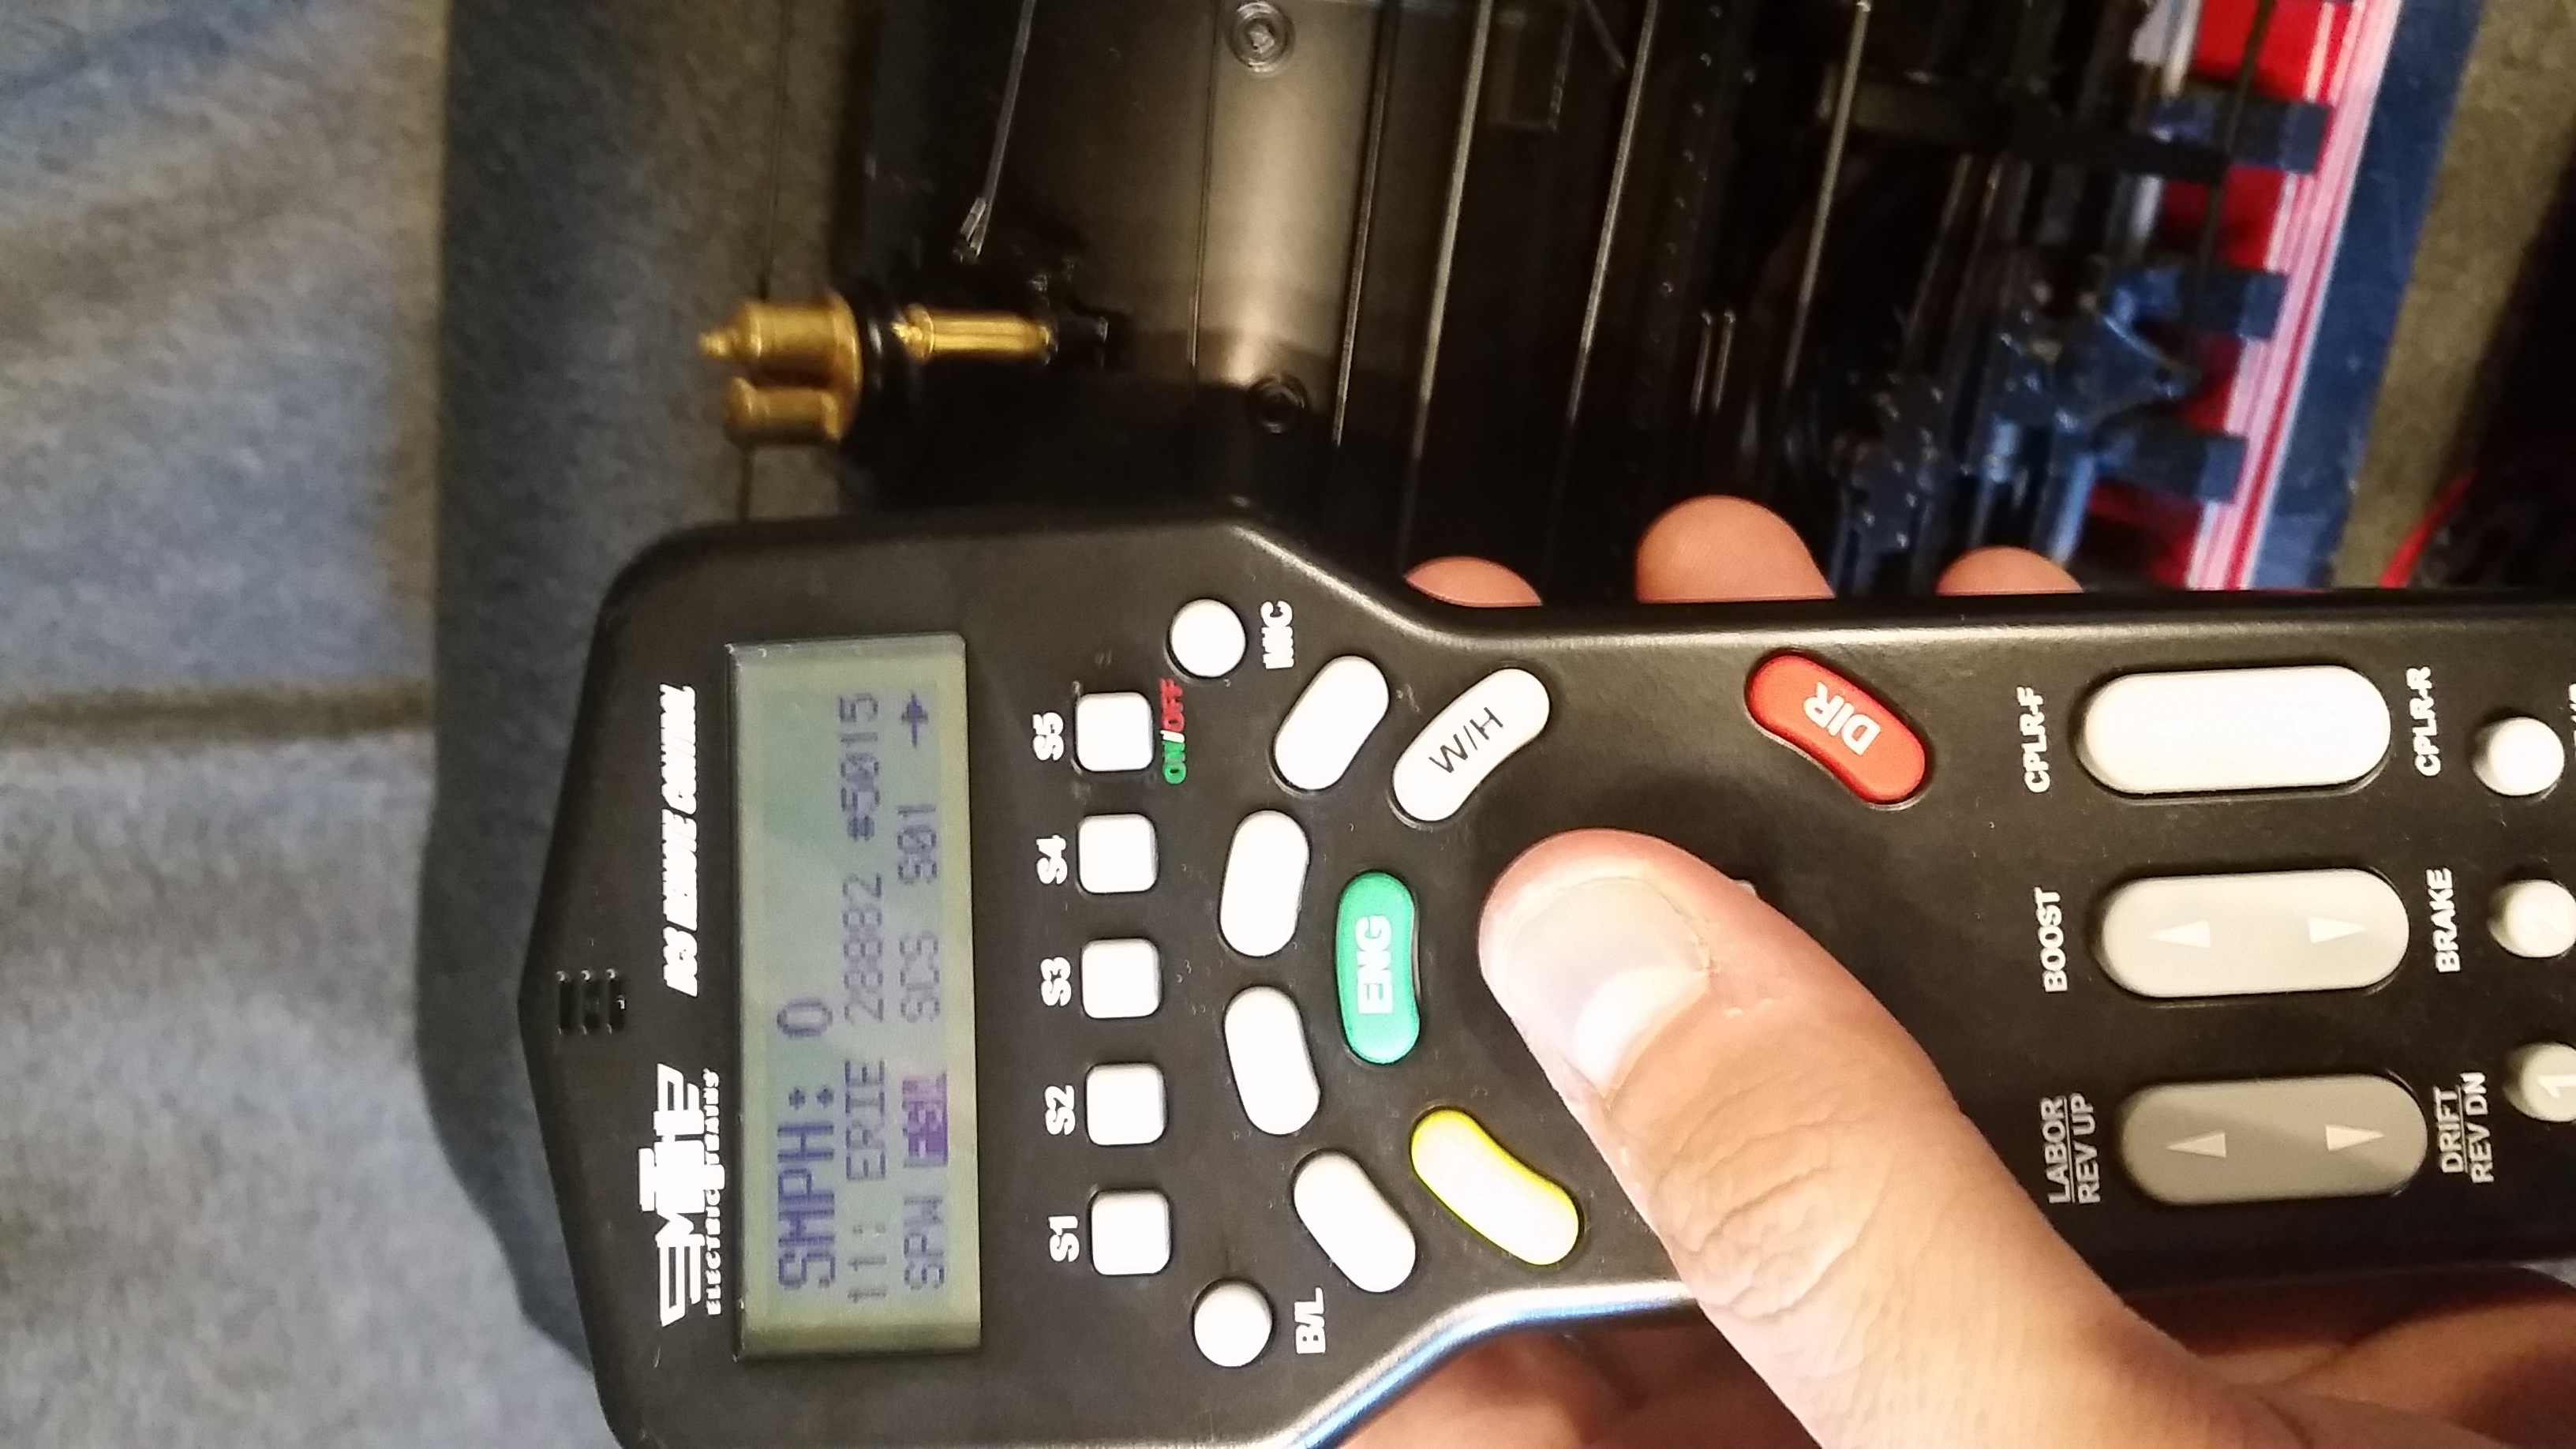
- Step 3a: Press "S1" (SPW) button - (SPW=Sound Play Whistle -- This turns the Whistle Quill feature on/off)
- Step 3b: Turn thumbwheel down - (This updates the screen to confirm SPW is highlighted/activated)
- Step 4: Rotate the thumbwheel up & down to change whistle tone (Three steps of quill are available).
- (Note: If you see smoke coming out the bottom of the boiler and not the top, blow in the top of the whistle hole to clear any fluid bubbles and retry)
- Step 5: Press Thumbwheel to go back and forth between quill mode and change engine speed (Note with quill mode activated you can't trigger whistle with W/H button)
To turn Smoking & Playable/Quillable Whistle off:
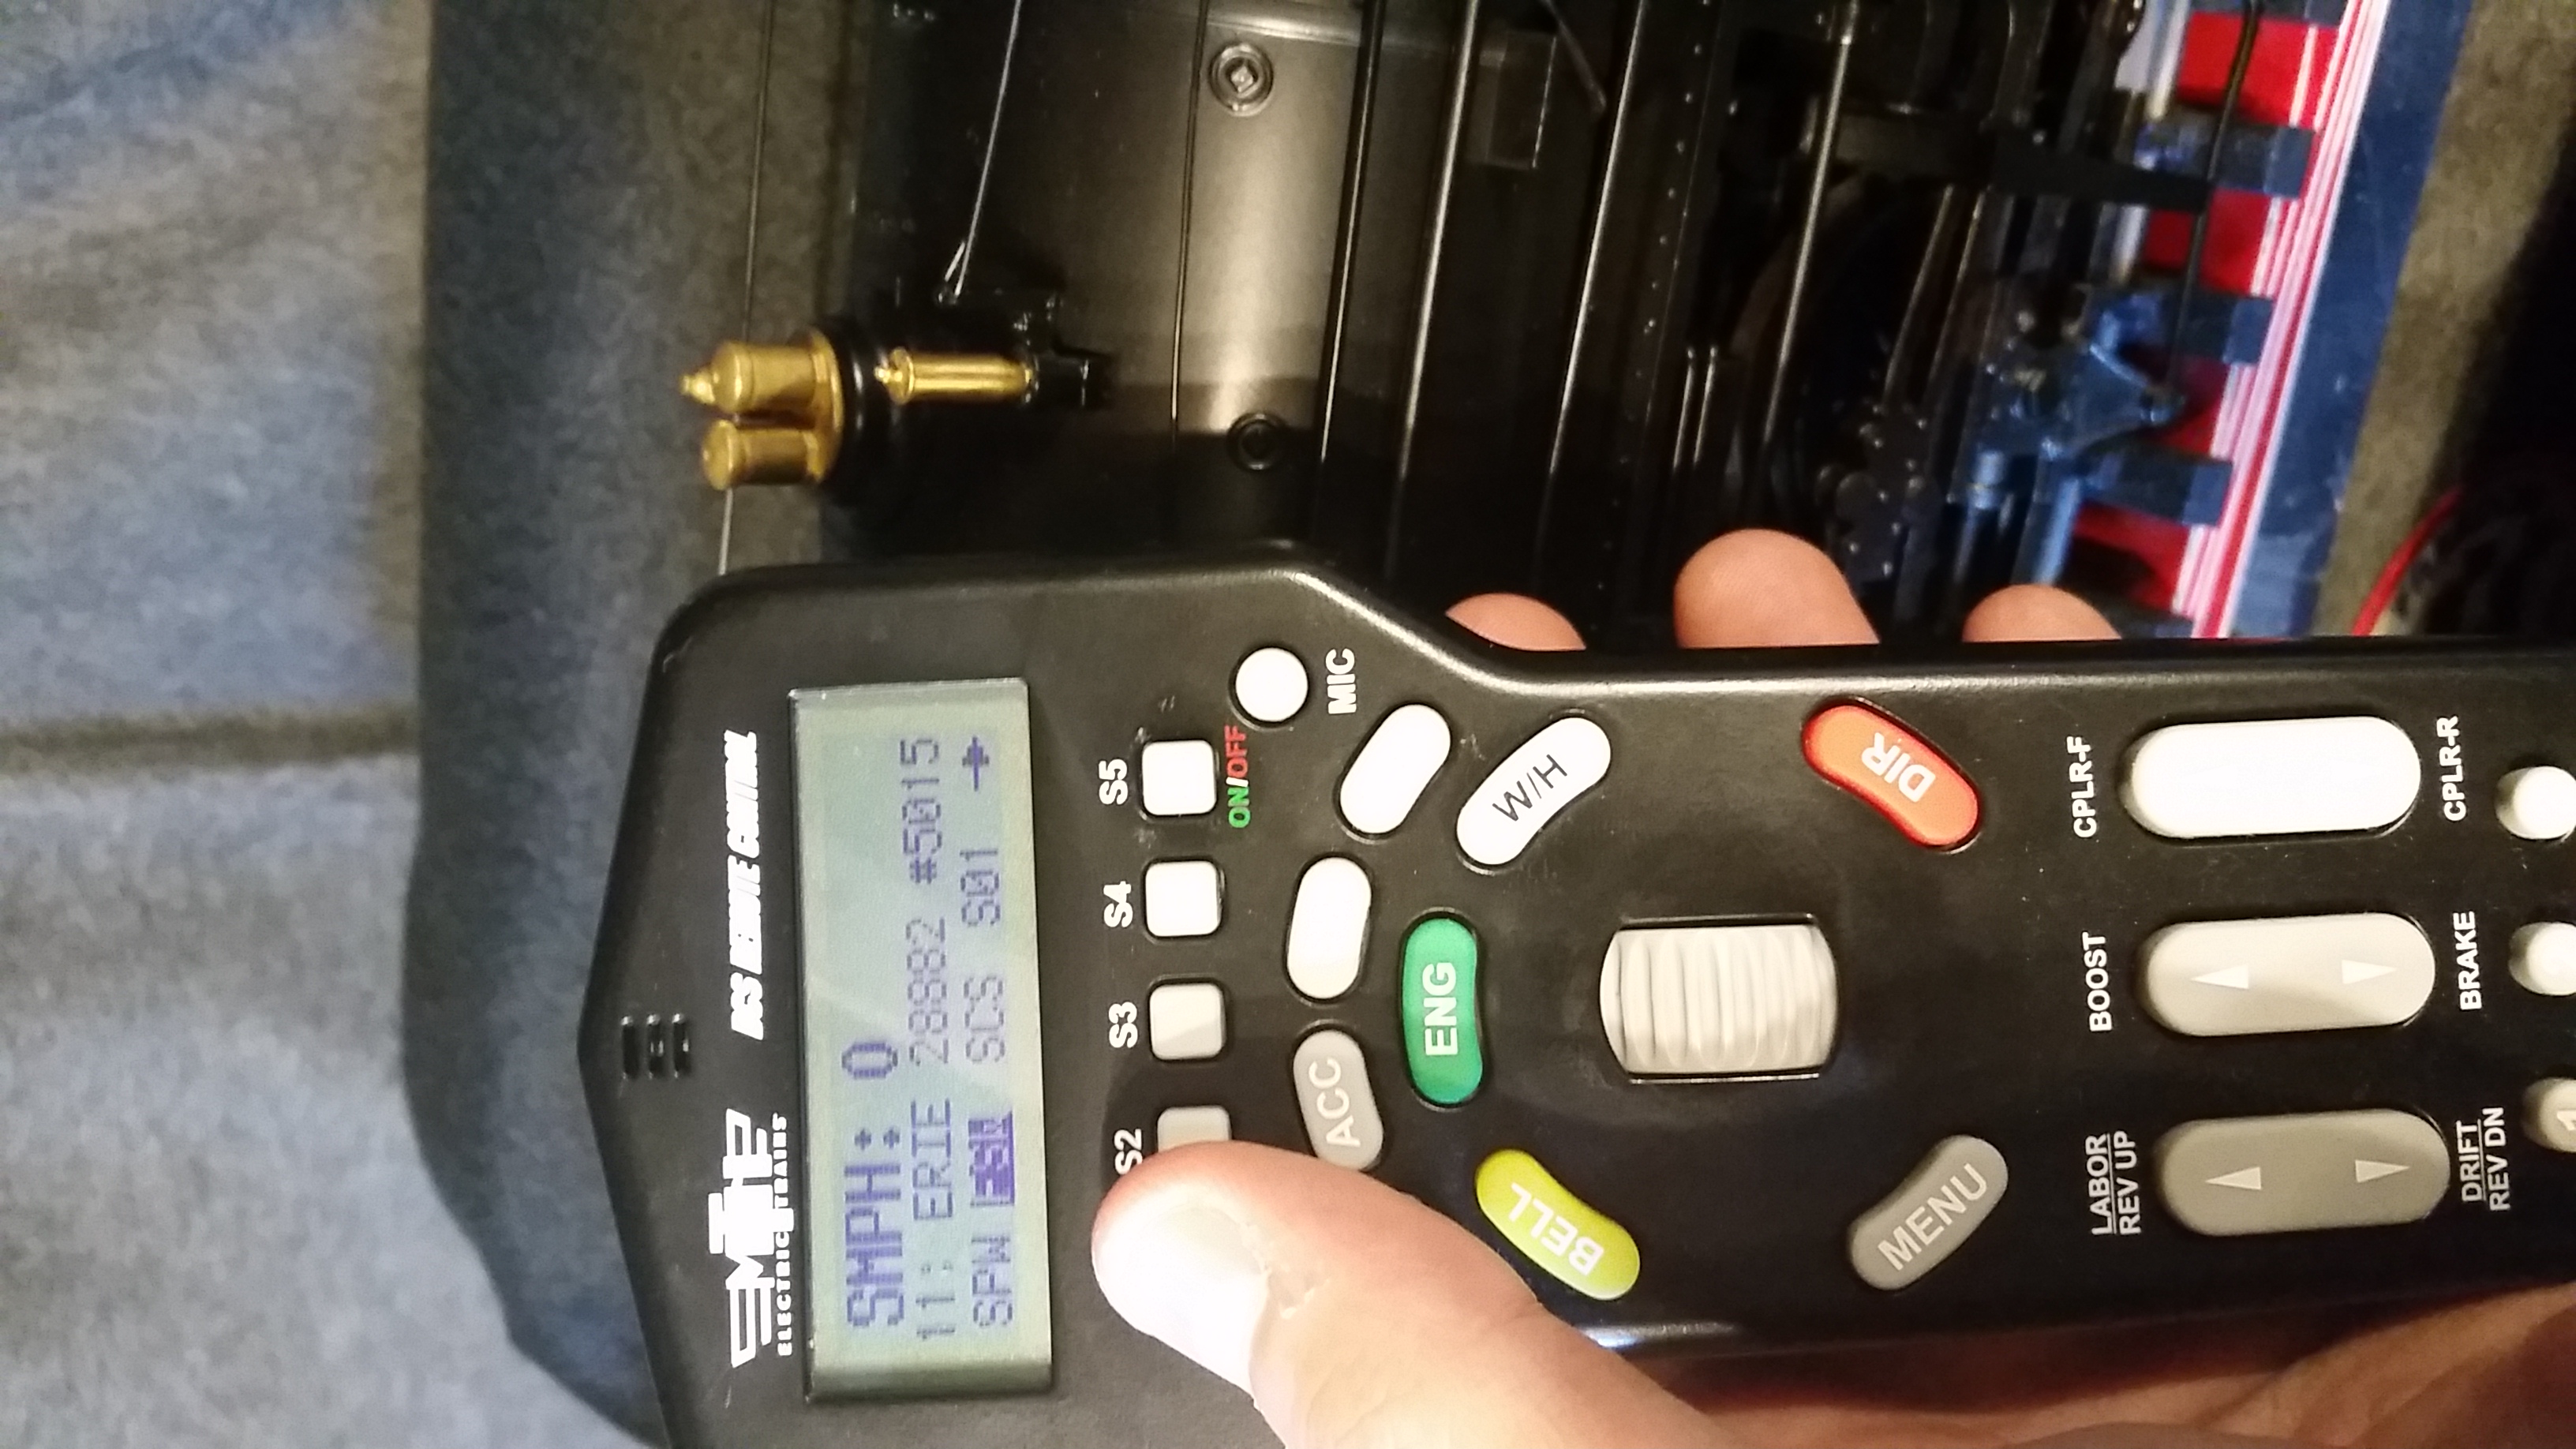
- Step 6: Press "S2" (FSW) button again - (FSW=Feature Smoking Whistle -- This turns on the smoke whistle heater back off)
- Step 6b: Turn thumbwheel down - (This updates the screen to confirm FSW is highlighted/activated)
- Step 7: Press "S1" (SPW) button - (SPW=Sound Play Whistle -- This turns the Whistle Quill feature on/off)
- Step 7b: Turn thumbwheel down - (This updates the screen to confirm SPW is highlighted/activated)
|
|
|
|
|
|
|
Playable/Quillable whistle (without smoking whistle):
To turn Playable/Quillable whistle on:
- Step 1a: Press "S1" (SPW) button - (SPW=Sound Play Whistle -- This turns the Playable/Quillable whistle feature on/off)
- Step 1b: Turn thumbwheel down - (This updates the screen to confirm SPW is highlighted/activated)
- Step 2: Rotate the thumbwheel up & down to change whistle tone (Three steps of quill are available).
- Step 3: Press Thumbwheel to go back and forth between quill mode and change engine speed (Note with quill mode activated you can't trigger whistle with W/H button)
To turn Playable/Quillable whistle off:
- Step 4a: Press "S1" (SPW) button - (SPW=Sound Play Whistle -- This turns the Whistle Quill feature on/off)
- Step 4b: Turn thumbwheel down - (This updates the screen to confirm SPW is unhighlighted/deactivated)
|
|
|
||||
__________________________________________________________________________________

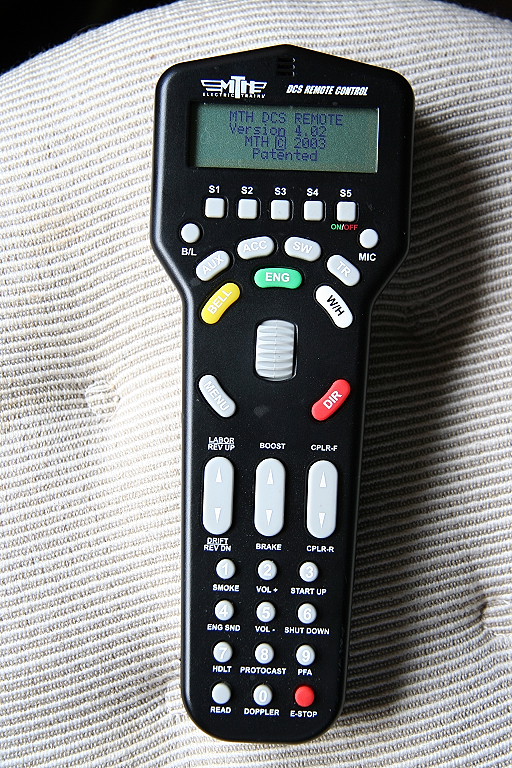
Photo Overview of Remote menus:
(Under software release 4.02a)
See the complete DCS Users Manual for full info: MTH DCS Users Manual (Fifth Edition)
(NOTE: This will be expanded as time allows to show additional menu item layers)
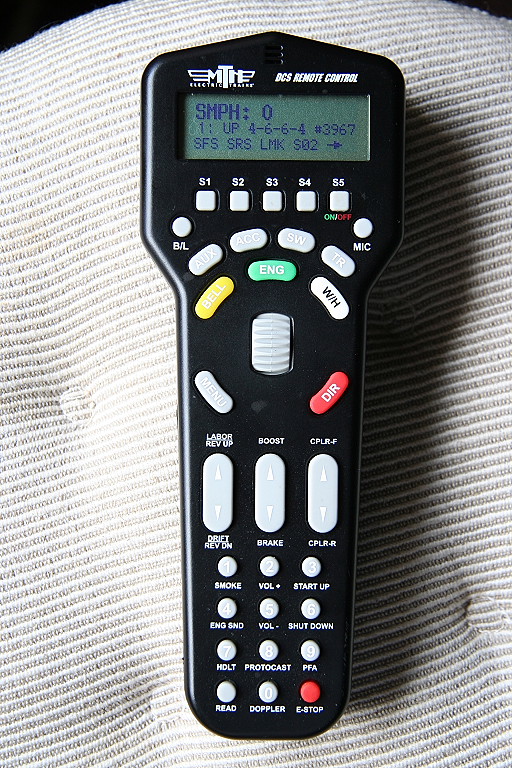
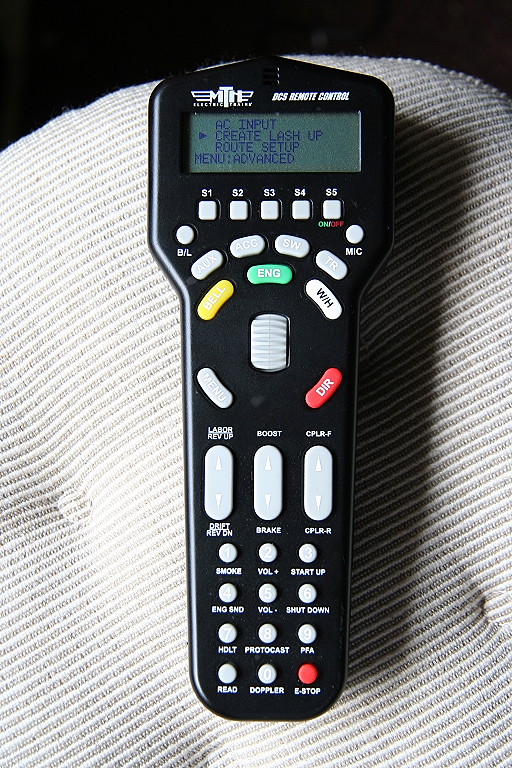
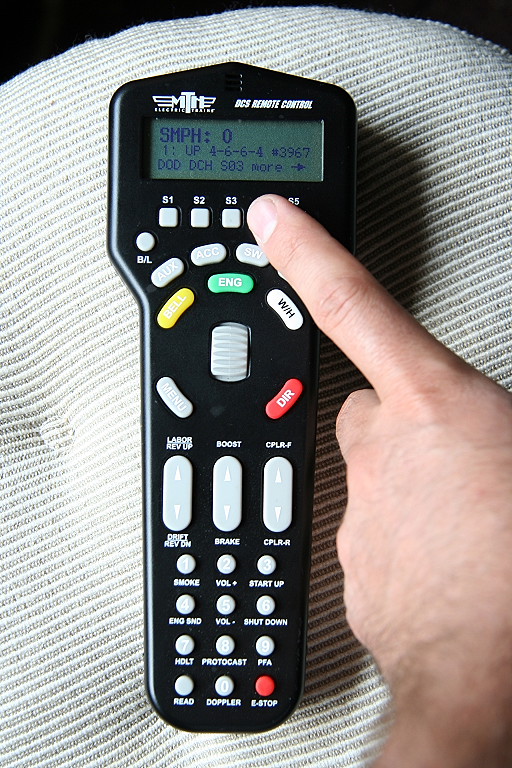
Power up info screen:
|
||||
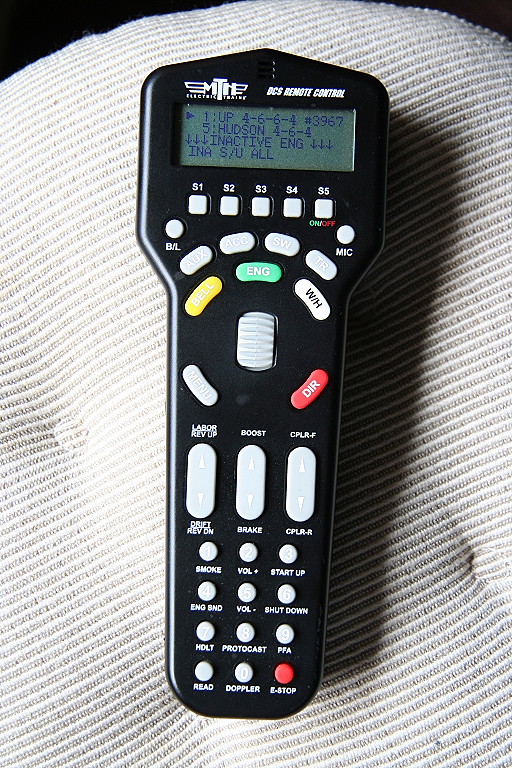
Engine Select menu: (Press green button) This allow you to select an engine. Active engines (on the track are listed first), Inactive below the Inactive line
|
|
|||
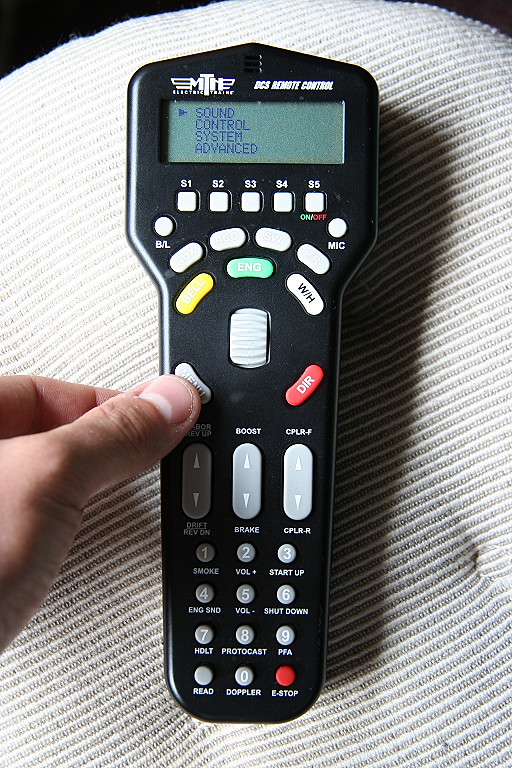
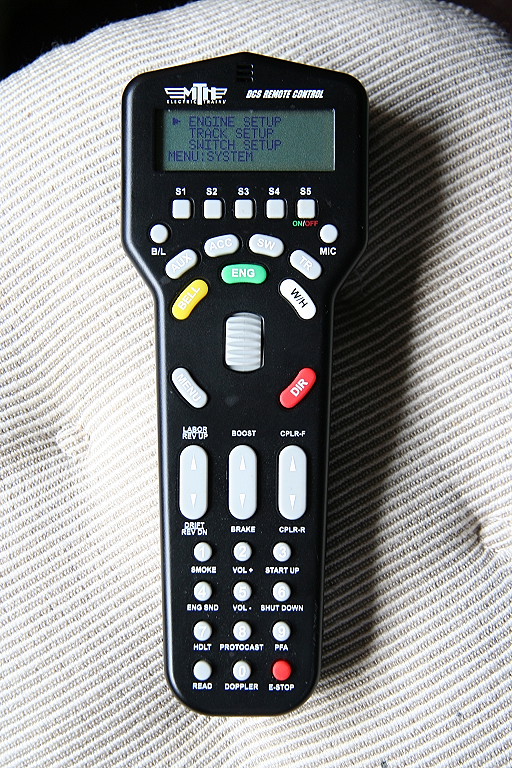
Main Menu: (Press the Menu button - SOUND, CONTROL, SYSTEM, ADVANCED)
|
||||
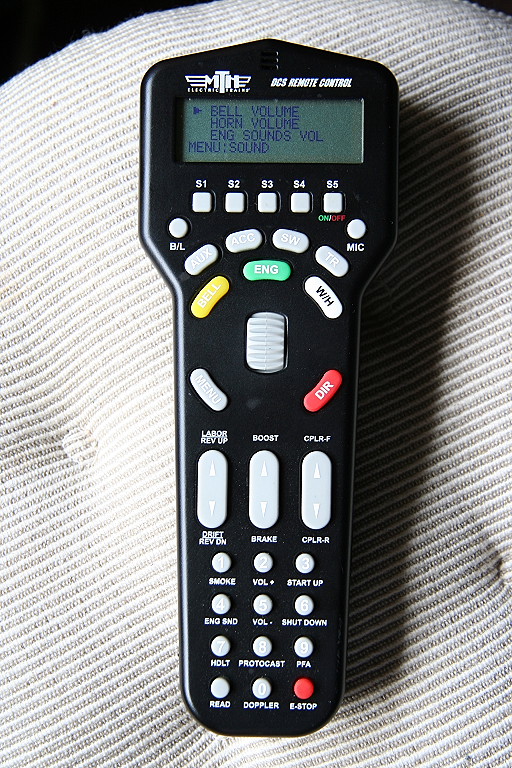
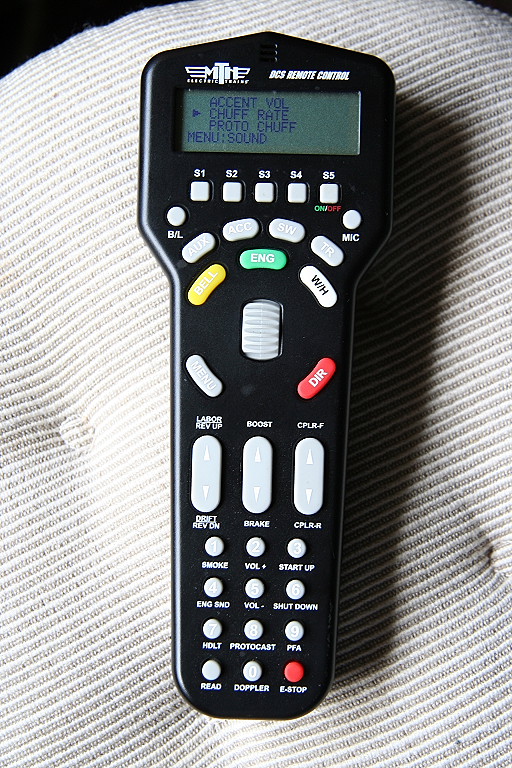
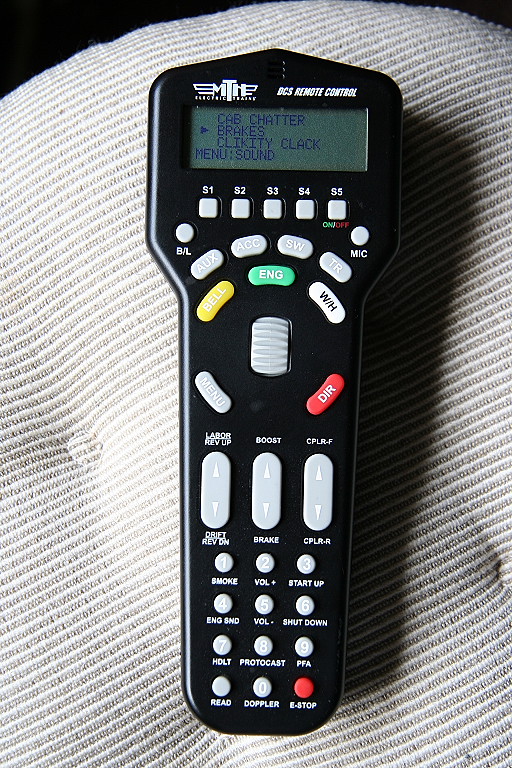
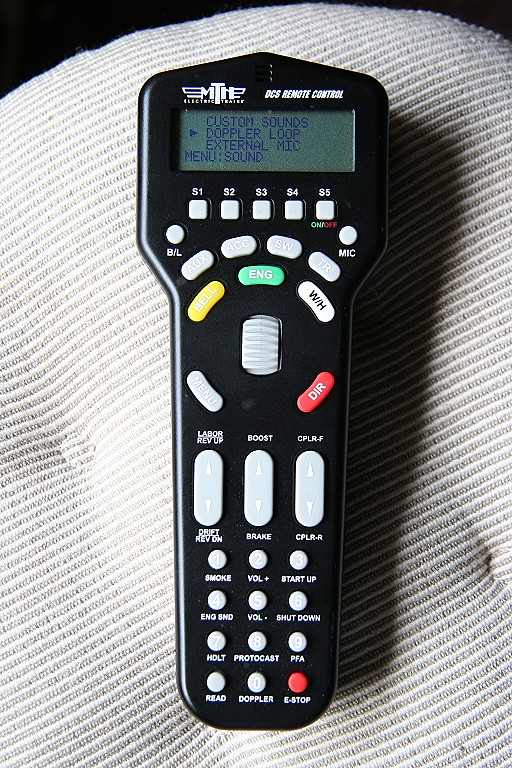
SOUND items:
|
|
|
|
|
SOUND item detail:
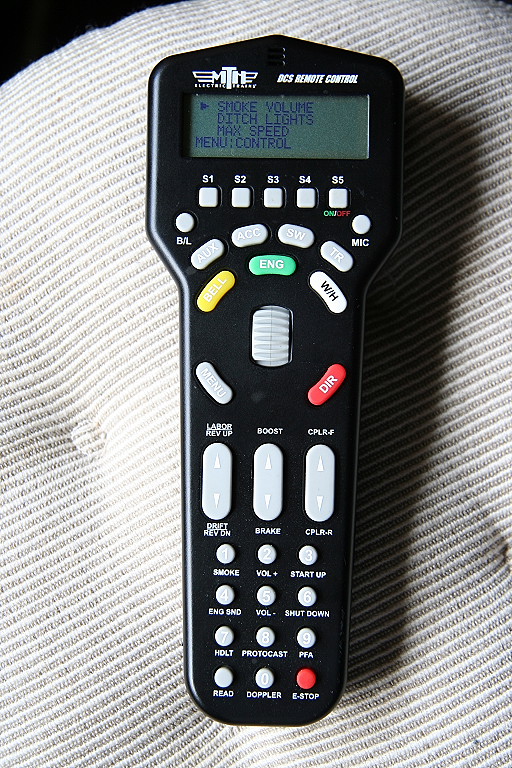
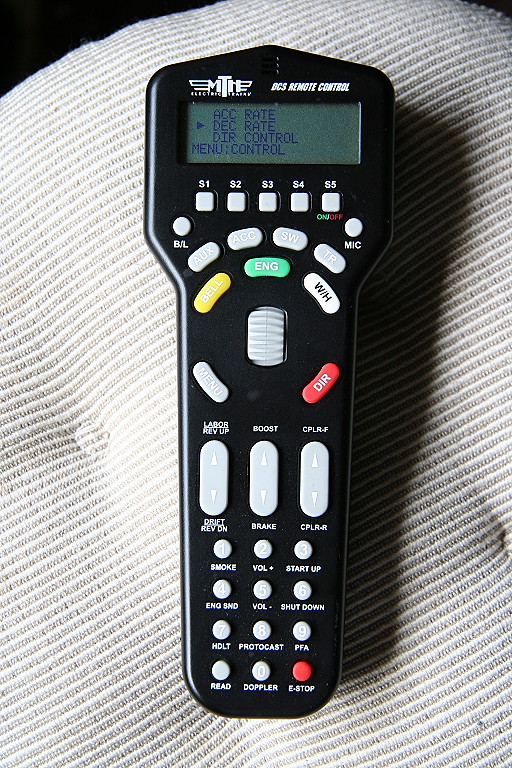
CONTROL items:
|
|
|
||
CONTROL item detail:
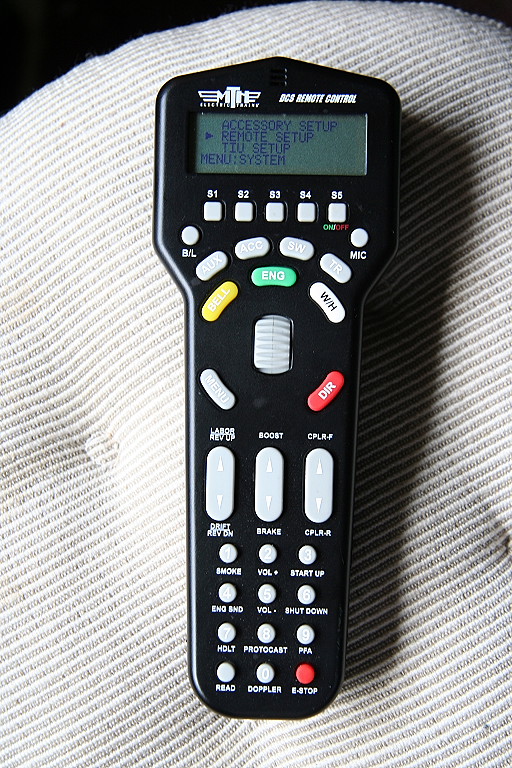
SYSTEM items:
|
|
|
||
SYSTEM item detail:
Variable 2
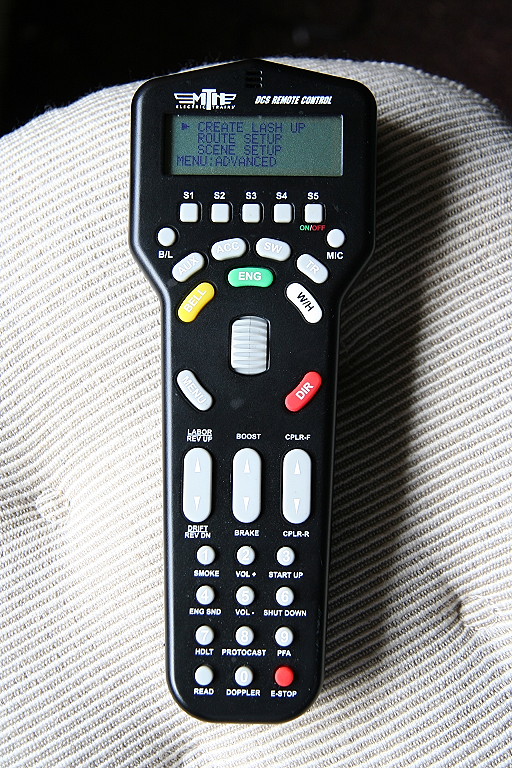
ADVANCED items:
|
|
|
||
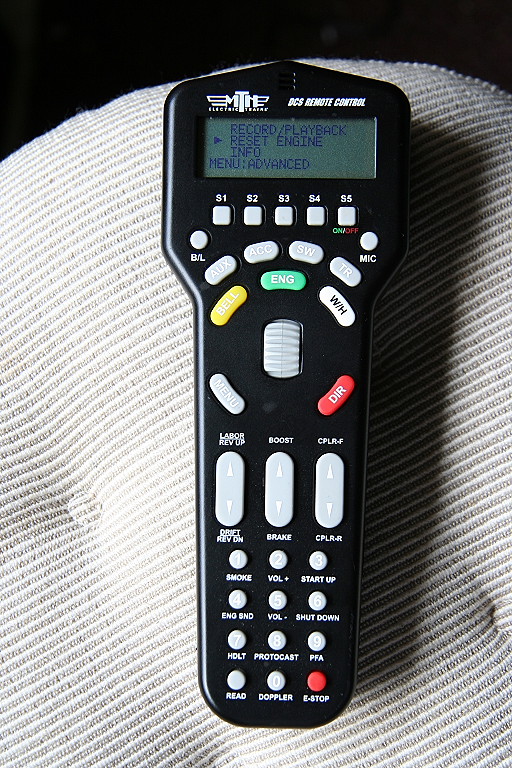
ADVANCED item detail:
Create Lash-up (Consisting multiple engines)
Route Setup
Create Route
Delete Route
Edit Route
Scene Setup
Create Scene
Delete Scene
Edit Scene
Record/Playback (operating session recording)
Record
Stop
Save
Play
Loop
Reset Engine
Feature Reset
Factory Reset
Info (Displays: distance & time run, battery status)
AC Input
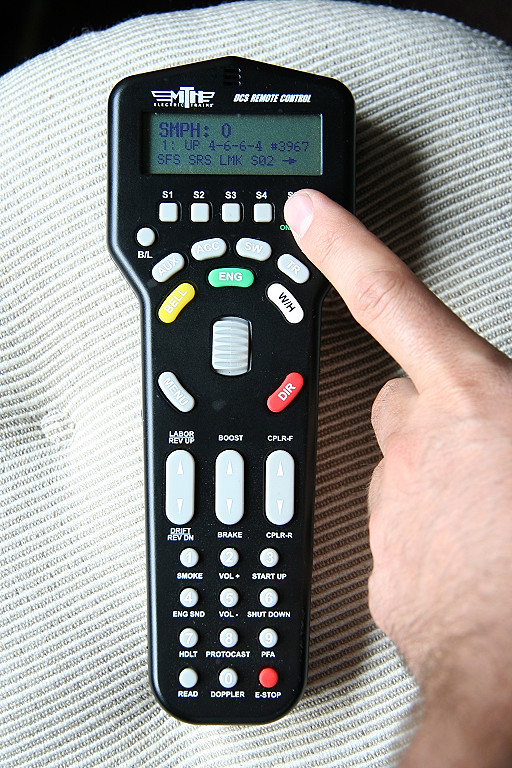
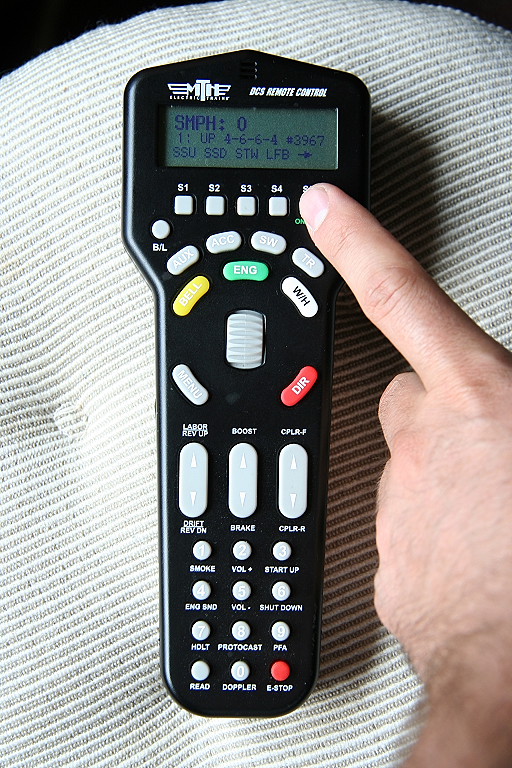
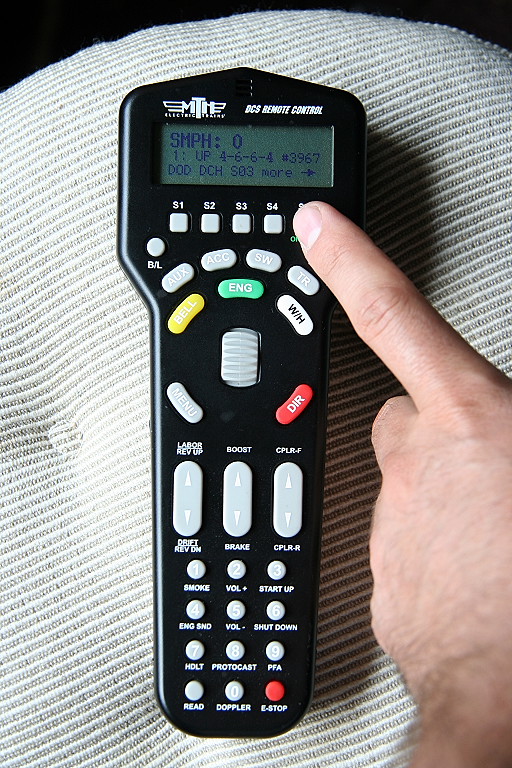
Soft-key options: (S1 thru S5 + More option)
|
|
|
||
Soft-keys allow quick access to commonly used control features: "Lxx" Lights, "Sxx" Sound, "Dxx" DCS/engine info
Examples:
"LIN"=Light Interior Cab
"LMK"=Light Marker Lights
"LFB"=Light Firebox
"LNB"=Light Number Board
"SFS"=Sound Forward Whistle/Horn
"SRS"=Sound Reverse Whistle/Horn
"SSU"=Sound Start-up Sequence
"SSD"=Sound Shutdown Sequence
"STW"=Sound Train Wreck
"S01"=Sound Sequence #1
"S02"=Sound Sequence #2
"DOD"=DCS Info Odometer (Scale miles traveled since last start-up)
"DCH"=DCS Info Chronometer (Minutes since last start-up)
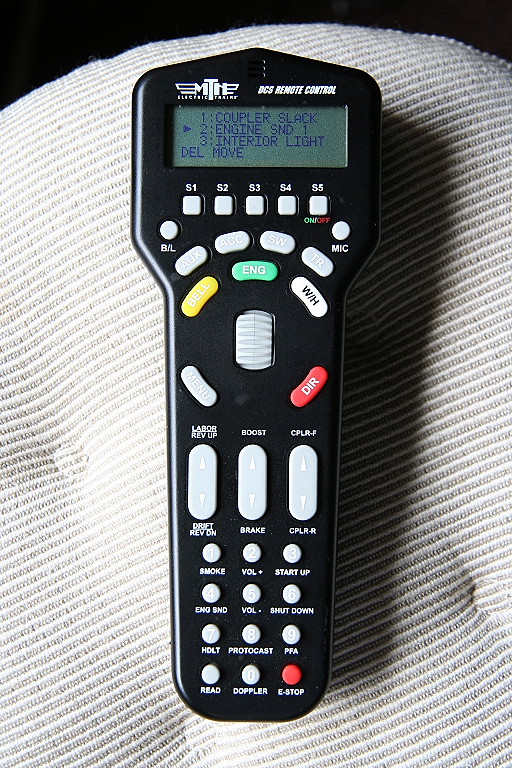
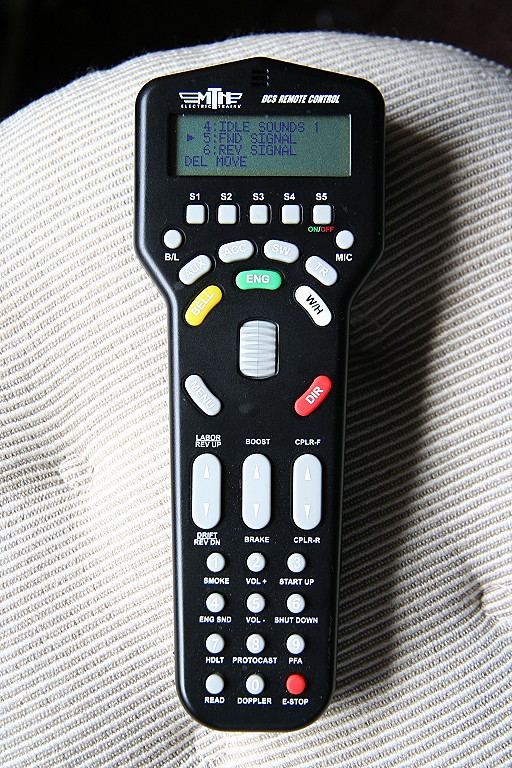
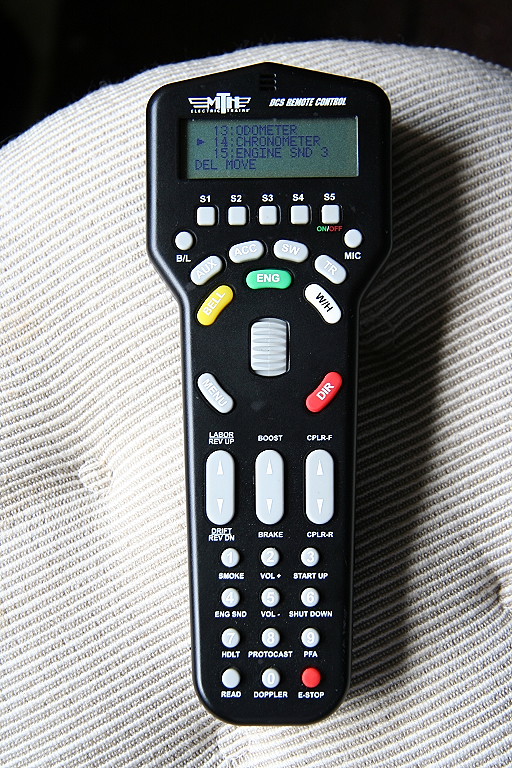
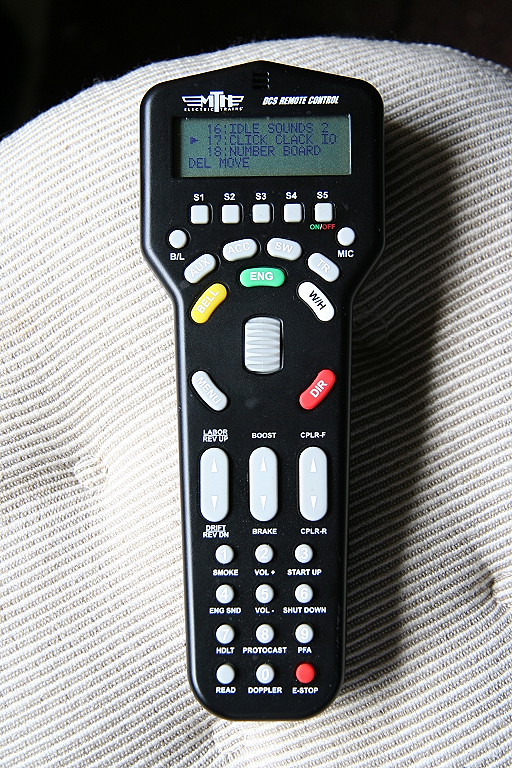
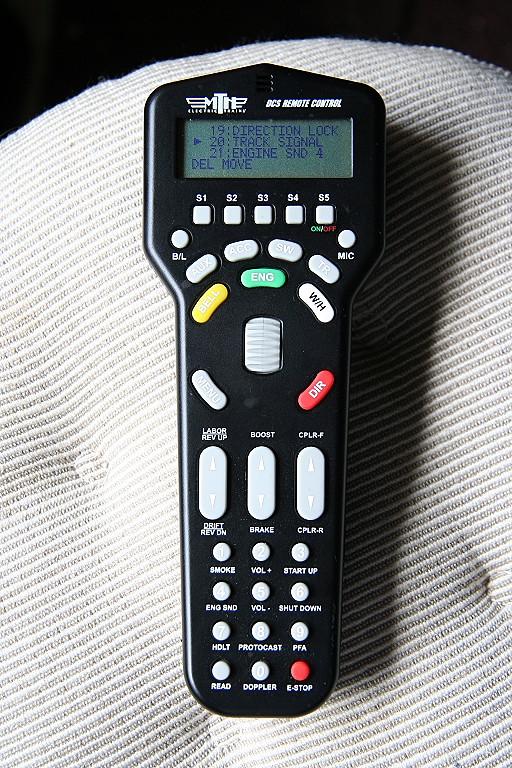
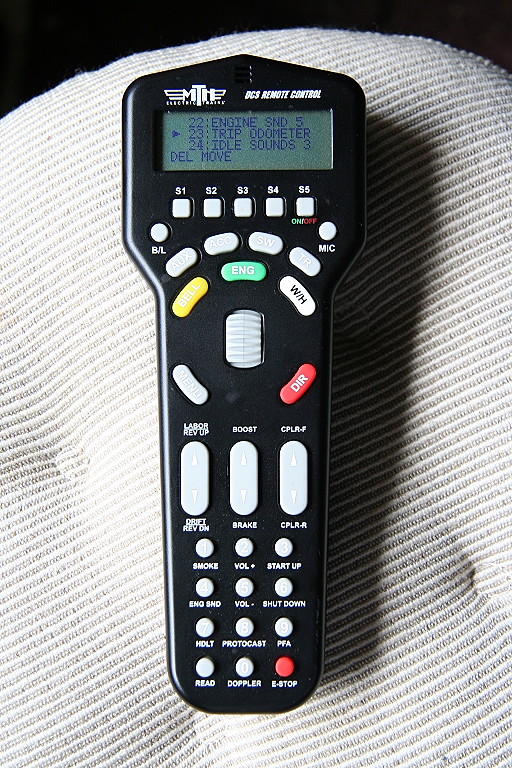
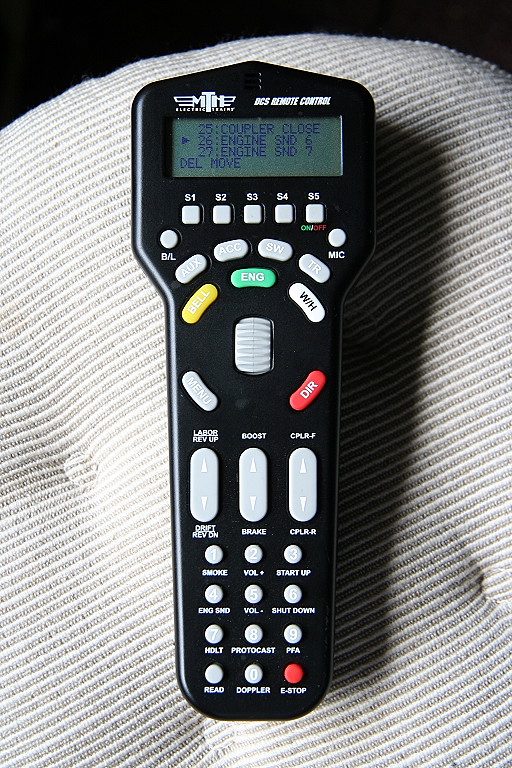
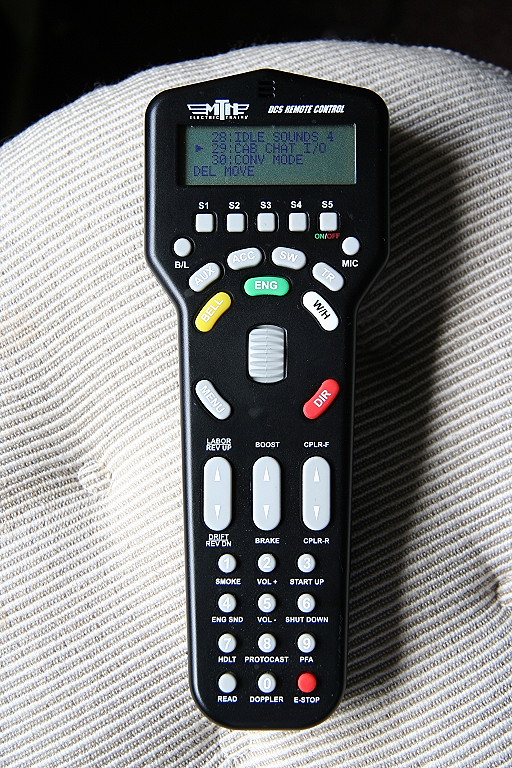
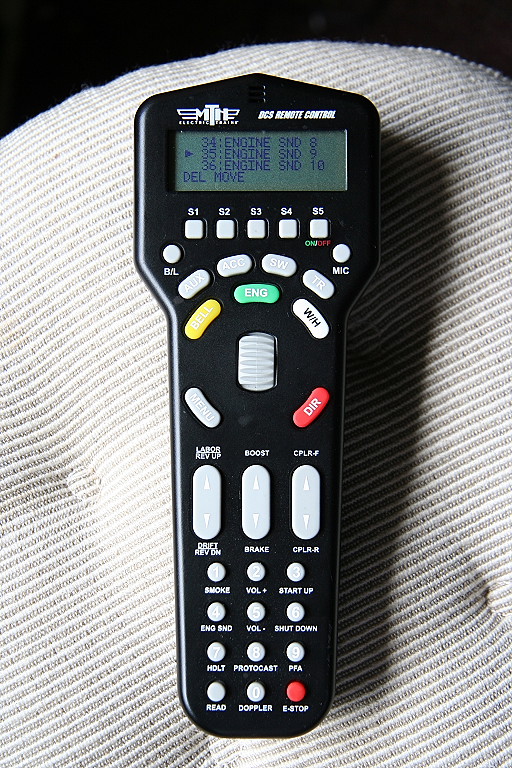
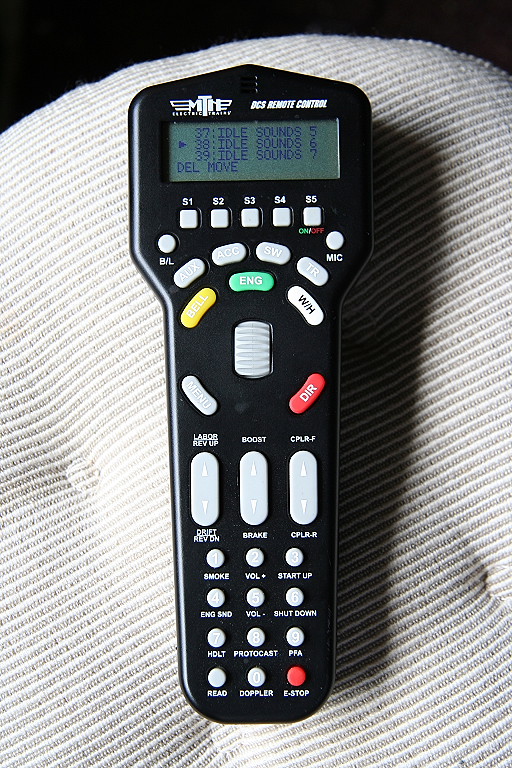
"More" soft-key items: (Items 1 thru 40)
|
|
|
|
|
|
|
|
|
|
|
|
|
|
|
||||||
Soft-key "More" options:
Coupler Slack (Auto/Off)
Engine Sounds #1
Interior Light
Idle Sounds #1
Forward Signal Sound (Two short whistle/horn retorts)
Reverse Signal Sound (Three short whistle/horn retorts)
Marker Light (On/Off)
Engine Sounds #2
Ext Start up (Full start-up sound sequence)
Ext Shut Down (Full shut-down sound sequence)
Train Wreck sound sequence
Firebox glow (Firebox lights On/Off)
Odometer (Total lifetime distance engine has run in Scale Miles)
Chronometer (Total lifetime Hours and Mins engine has been started up/run)
Engine Sounds #3
Idle Sounds #2
Click Clack (Clickity Clack sound Auto/Off)
Number Board (Lights On/Off)
Direction Lock (Keeps engine going forward or reverse)
Track Signal (Check track signal levels)
Engine Sound #4
Engine Sound #5
Trip Odometer - Scale miles run since last start-up
Idle Sounds #3
Coupler Close (Sound)
Engine Sound #6
Engine Sound #7
Idle Sounds #4
Cab Chat I/O (Cab Chatter On/Off)
Conventional Mode
Track Voltage (Check track voltage the engine is getting)
Measure Route (Measure distance start / end in Scale miles)
Legacy Mode
Engine Sound #8
Engine Sound #9
Engine Sound #10
Idle Sounds #5
Idle Sounds #6
Idle Sounds #7
Maintenance (Check how many miles left before maintenance required on engine / reset maintenance counter)
DCS Remote Control Icon List
The Remote may display a letter indicator on the screen under certain conditions:
__________________________________________________________________________________
DCC Operation of PS3 (Protosound 3) Equipped Engines:
Reference manuals:
One Gauge & O Gauge (Steam): DCC Complete Reference (Steam) PDF (For PS3 upgraded & current MTH factory equipped engines)
One Gauge & O Gauge (Diesel): DCC Complete Reference (Diesel) PDF (For PS3 upgraded & current MTH factory equipped engines)
HO scale: *Please refer to your engine manual*
Master Reference page for using various DCC control systems with MTH PS3 engines: *Click here*
- NCE: Programming/Changing Addresses using the NCE System (Pro Cab, Power Cab and Master Series) PDF
Getting Started:
As with operating any PS2 or PS3 engine under DCS in with the remote and TIU (aka Command Mode), when you first apply DCC power to the engine, it will stay in one place with no sound or lights activated.
Programming Track (for DCC operation):
MTH Proto-Sound 3.0-equipped locomotive does not program well on Programming tracks due to the inclusion of super capacitors utilized in the locomotive's electronic package. The super capacitors provide backup power to the electronics, allowing the locomotive to better negotiate track sections suffering from poor electrical conductivity. This ensures that sounds continue to play, the locomotive continues to move forward and lighting remains lit. During power shutdowns, the super capacitors provide power to allow the locomotive shutdown sounds to continue playing through their conclusion. Unfortunately, the super capacitors require that operators ONLY program engine CV’s using Programming on the Main (PoM) (Also known as 'Ops Mode' or 'Operations Mode').
F3 - Start up / Shut down:
- Select engine address 3 (which is the factory default)
- Press F3 (Start Up/Shutdown) to startup the engine (This will activate Sound, Lights and Smoke during operation)
- When you are ready to shutdown your engine just press F3 again.
Speed Steps:
- Protosound 3 engines are compatible with 14, 28 and 128 speed steps. 128 is recommended as each step = 1 SMPH, so w you will get more precise and smoother operation.
Sounds: (For MTH factory equipped protosound engines refer to your engine manual to confirm actual functions)
One Gauge & O Gauge:
- F1 = Bell (Toggles bell sound on/off)
- F2 = Horn/Whistle (Activates whistle for as long as the button is pressed)
- F4 = PFA (Passenger/Freight Announcements) - See this link for more info and video: Passenger/Freight Announcements
- F6 = Master Volume (Controls overall volume for all sounds up and down in increments)
- F9 = Forward whistle/horn sound (plays 2 short whistle/horn retorts)
- F10 = Reverse whistle/horn sound (plays 3 short whistle/horn retorts)
- F11 = Grade Crossing whistle sound (plays 2 long, 1 short and 1 long whistle/horn sequence)
- F14 = Idle engine sounds #3
- F15 = Idle engine sounds #2
- F16 = Idle engine sounds #1
- F17 = Extended Startup sound sequence
- F18 = Extended Shutdown sound sequence
- F19 = Rev Up(Diesel) / Labor Chuff (Steam) - Revs up diesel engine / Plays heavy chuffing sounds to simulate a heavy load)
- Note: With the DCS remote this option also increases the diesel engine sound steps
- F20 = Rev Down(Diesel) / Drift Chuff(Steam) - Revs down diesel engine / Plays softer chuffing sounds to simulate a light load
- Note: With the DCS remote this option also decreases the diesel engine sound steps
- F21 = Doppler sound effect (One time effect)
- F22 = Coupler Slack sound
- F23 = Coupler Close sound
- F24 = Single Horn/Whistle Blast
- F25 = Engine Sounds
- F26 = Brake Sounds (On/Off)
- F27 = Cab Chatter (On/Off)
Smoke: (Functions can very, please refer to your engine manual to confirm for your engine)
One Gauge & O Gauge:
- F12 = Smoke (on/off)
- Note: Make sure you have the smoke switch on the engine/tender set to ON in order to turn smoke on under DCC. (If you have a turn potentiometer instead of switch, turn the control pot all the way CCW=Counter Clock Wise, then you can Turn smoke ON
- F13 = Smoke Volume (Cycles smoke thickness settings MIN, MED, MAX)
- F28 = Feature Reset (Resets all engine features [lights, sound smoke] back to factory default)
Lighting: (Functions can very, please refer to your engine manual to confirm for your engine)
One Gauge & O Gauge:
- F0 = Headlight (on/off)
- F5 = Cab interior light (on/off)
- F28 = Feature Reset (Resets all engine features [lights, sound smoke] back to factory default)
DCC "F" Function List: (As used on the DCC remote) (For MTH factory equipped protosound engines refer to your engine manual to confirm actual functions)
One Gauge & O Gauge:
DCC CV Values: (For MTH factory equipped protosound engines refer to your engine manual to confirm actual functions)
One Gauge & O Gauge:
__________________________________________________________________________________
AC Analog Operation of PS2/PS3 Engines (Using AC Throttle power supply with Whistle & Bell Buttons):
__________________________________________________________________________________


.jpg)

.jpg)

